У світі Minecraft видобуток є важливим для прогресу гравця. Однак видобуток може бути небезпечним і трудомістким, якщо його не зробити добре. Нижче наведено кілька порад, які надає громада щодо виконання цієї підземної роботи.
Шахтні шари[]
| Ресурс | Знаходження |
|---|---|
| Гравій | Можна знайти нижче y=111. |
| Вугільна руда | Можна знайти нижче y=128, але частіше зустрічається між y=5 і 66. |
| Залізна руда | Можна знайти нижче y=63, але частіше зустрічається між y=58. |
| Золота руда | Можна знайти нижче y=33, але частіше зустрічається між y=29. У біомі пустош він також генерується між y=32 і 79. |
| Лазуритова руда | Можна знайти нижче y=31, але частіше між y=13 і 16. |
| Смарагдова руда | Можна знайти нижче y=4 and 32, але частіше зустрічається між y=29. Генерується виключно в горах. |
| Діамантова руда | Можна знайти нижче y=16, але частіше зустрічається між y=5 і 13. |
| Червоний камінь | Можна знайти нижче y=16 |
| Лава | Виключаючи озера лави, можна знайти нижче y=10, але рідше внизу y=4. |
| Корінна порода | Можна знайти нижче y=5. |
Через те, що найбезпечніші шари для видобутку шахти, де всі руди існують у розумних кількостях (особливо діаманти), шар від 10 до 15 зазвичай вважається найкращою зоною, де можна розпочати видобуток. Єдиний найкращий шар для видобутку є дуже дискусійним і не узгоджено. Використання екрана налагодження (F3) — це найпростіший спосіб знайти висоту гравця. Гравець також може шукати басейни лави, всі повітряні блоки між рівнем 1 і 10 перетворюються на лаву під час світового покоління. (Видобуток цього шару забезпечує те, що підлога залишатиметься цілою, якщо вони заливають воду). Гравець може навіть знайти і стати на верхньому шарі основи, а потім піднятися на 6 блоків. Після того, як вони знайдуть потрібний шар, вони можуть приступити до видобутку за допомогою однієї з перелічених нижче методик.
Готування до шахти[]
Корисно принести їжу, дрова, вугілля, смолоскипи, мечі та відро з водою. Гравець може захотіти принести ліжко, якщо він кілька днів проводить під землею, щоб їм не довелося йти додому, щоб поспати. Також потрібно обов’язково принести два чи більше паличок, оскільки їх можна швидко перетворити на кайло, смолоскип, меч тощо. Крім того, якщо у гравця є запасне залізо, рекомендується приносити залізні кайла замість кам'яних кайлів, оскільки вони швидше ломають блоки і мають більшу міцність. Якщо гравець шукає обсидіан, то їм потрібно мати діамантове кайло.
Загубитися в печері без їжі може призвести до голоду. Без меча гравець буде беззахисним від великої кількості мобів, які спавнятся в темряві під землею. Щит — це також хороший спосіб захистити себе в темряві.
Якщо гравці схильні втрачати дорогу назад або просто хочуть бути більш безпечними, спробуйте позначити їх шлях смолоскипами чи іншим унікальним утворенням, наприклад, знаками, березовими дошками або кольоровою вовною. Це також допомагає їм відновити свої предмети, якщо вони помруть. Вирішення безпечної кімнати, що містить пічі, верстак, ліжко та скриню, можливо, вартує свого часу. Якщо вони проводять багато часу під землею, вони можуть захотіти залучити ресурси для більш досконалої бази.
Лава є дуже небезпечною і стає досить поширеною на нижчих рівнях, тому не забудьте принести два відра з водою під час видобутку. Два відра дозволяють гравцеві створити нескінченне джерело води для поповнення водопостачання. Викопайте отвір 2х2 і помістіть воду в два протилежних кути, і тепер у них є нескінченна вода. Це також можна зробити, розмістивши воду на обох кінцях 3 рази; 1 отвір. Це може допомогти гравцеві дістатися до руд вище лави. Просто поставте воду поруч із джерелом лави, і вода перетворить лавові блоки зверху басейну на обсидіан.
Броня має важливе значення для зменшення шкоди, завданої ворожими мобами та лавами.
Є три основні способи запуску шахти, хоча їх можна комбінувати:
- Знайдіть одну з безлічі печер, яка відкривається на поверхню, і починайте досліджувати її, як правило, йдучи вниз. Навіть неглибокі печери мають багато вугілля та заліза, а пізніше золота та інших руд. Печери пропонують перевагу в тому, що для гравця вже було розкопано багато каменю, оголивши багато рудних жил. На зворотній стороні вони часто містять велику кількість ворожих мобів, і вода, і лава можуть бути клопітними.
- Якщо, замість правильного входу в печеру, є глибока яма або рівнина, гравці можуть почати з цього. Використовуйте відро для води, щоб створити водоспад, по якому вони можуть плисти вниз (і назад), а потім продовжуйте, як вище, з печерами, які відкриваються в яру. Слідкуйте за монстрами, що падають з високих уступів. Гравець, можливо, захоче стрибати стовпами, щоб запалити ці виступи і шукати високі тунелі.
- Крім того, гравці можуть зробити власний вхід у підземний світ: викопати вертикальну або діагональну шахту, де це зручно, наприклад, задній шахта в основі, і почати копати горизонтальні шахти на відповідній глибині. Для цього потрібно більше інструментів (оскільки гравець викопує все самостійно), але при належному освітленні вони навряд чи побачать монстрів. Їхня шахта, ймовірно, також відкриється в печери, які вони можуть вивчити, як вище. Постійно обговорюють, які методи найкращі для видобутку руд, але для початкового шахтної печери найбезпечнішим методом є, мабуть, вал розміром 1×3, оснащений сходами в середині, а також випадкові виступи у випадку, якщо гравець впаде зі сходів. Незалежно від того, як гравець влаштовує речі, їм потрібно запалити вали належним чином, щоб уникнути спавн монстрів. Гравець також може звернутися до шахтів, коли печера видобувається. Це гарна ідея видобувати все, включаючи вугілля, оскільки гравець ніколи не знає, коли вони можуть бути загублені та потребуватимуть більше смолоскипів.
Добування в шахті[]
Також відомий як печерне полювання, печера або заклинання, видобуток печер — це просто практика дослідження печер і видобування руд, виявлених на її стінах, підлогах і стелях. Дослідження великої печерної системи майже завжди призводить до знаходження великої кількості руди, хоча гравці, мабуть, знайдуть більші жилки руди, що не виявляються, тому що покоління печер іноді відключає покоління жил. Печерний видобуток має високу рентабельність інвестицій, даючи більше руди за одиницю часу і вимагаючи меншої кількості інструментів (менше міцність кайла та лопати втрачається моховитий камінь, земля та гравій), ніж інші підходи. Якщо ви підете до величезної печери, ви помрете .
З іншого боку, видобуток печер також є досить небезпечним. Недосліджені печери темні і, як правило, містять багато ворожих мобів. Мечі, луки та броні — необхідні речі. Гравець повинен нести велику кількість смолоскипів, щоб освітити печеру, щоб запобігти спавну ворогів. Великі печерні системи можуть стати заплутаними та небезпечними. Особливу увагу потрібно приділити навігацію, щоб не швидко загубитися. Занадто швидке переміщення по печері дозволяє легко пропустити непросвітлені проходи навколо гравця, де можуть вийти монстри, і збільшує шанс потрапити в шахту. Це стає надзвичайно небезпечним, коли гравець застряг там і стикається з мобами. Гравці також можуть потрапити в басейн лави, що призведе не тільки до смерті, але і до того, що всі їх предмети будуть знищені в лаві. Усі повітряні блоки перетворюються на лаву під час генерації нижче шару 10. Через ці фактори гравці зазвичай ретельно досліджують і освічають печеру перед видобутком руд.
У статті печера містяться поради щодо роботи з великими печерними системами, тоді як у навчальному посібнику з навігації є розділ про печери.
Краще взяти з собою відро з водою. Печери часто містять випадкові потоки лави, а чанки печер нижче 10 рівня заповнені великими басейнами лави. Відро води служить і вогнегасником, якщо гравець потрапить; і як спосіб формування обсидіанових поверхонь над басейнами лави (налийте воду на твердий блок, що прилягає до басейну лави; не стоїть між цією плямою та лавою). Якщо у вас є проблеми з мобами, гравець також може перейти до варіантів і змінити складність на "мирний", щоб запобігти спавну мобів. Однак гравець все одно може померти від лави, тому не забувайте про відро з водою.
Печери часто містять тупикові проходи та вали, або маси гравію та землі, що перекривають шлях. Багато з цих тупиків насправді є тонкими бар'єрами, які, якщо їх усунути, виявляють постійні проходи, іноді до цілих сусідніх печерних систем. "Дрифтинг" — це термін простого пошуку сусідніх печер, копаючи поза межами очевидних тупиків. Дрифтинг може бути ефективним у пошуку підземеллях, якщо в глухому куті чути звуки мобів. Після того, як гравці можуть скласти поршні, вони також можуть допомогти виявити сусідні печери, навіть через скелю: Встановіть обличчя до стіни та ввімкніть її важелем або смолоскипом. Якщо на відстані 12 блоків перед поршнем є відкритий простір, він просуне отвір у стіні.
Покинута шахта[]
Покинуті шахти часто зустрічаються та перетинаються печерами, але гравець цілком може наткнутися на одну з них під час видобутку власних тунелів. Справа з ними схожа на звичайну печерний видобуток, але ресурсів багато, особливо дошки та нитки, отримані з ножиць та мечів (з павутиння). Нитку також можна обробити у вовну для фломастерів. Особливі небезпеки тут полягають у тому, що в тунелях шахтів простіше загубитися: вони виглядають небезпечно подібними, а заздалегідь розміщені смолоскипи, що ускладнюють розуміння, які місця вони вже дослідили. Ідея не загубитися на шахті — розміщувати смолоскипи лише на лівій стороні стіни, щоб, повертаючись, смолоскипи завжди знаходились праворуч. Покинуті шахти вали можуть містити спавнери печерних павуків, до яких досить важко дістатися та знищити. Часто на невеликій території їх може бути більше, тому навіть якщо гравець знищує спавнера, будьте попереджені про можливість того, що на цьому місці буде більше спаверів. В межах 16 блоків (або менше) один від одного може бути два, три або (дуже рідко) навіть чотири спавнера печерних павука, але, як правило, у будь-якій місцевості є максимум один спавнер. Якщо спавниться печерний павук, переконайтеся, швидко поставте смолоскип, перш ніж він стане ворожим, а якщо він вже ворожий, поставте відро з водою, щоб вони були відштовхнуті назад поточною водою, що полегшить вбивство. Побудуйте 2-х блочний високий стовп, щоб ви могли нападати на печерних павуків, поки вони піднімаються на вас, тримаючи їх у страху і не захищаючи себе від пошкоджень.
Оскільки опори тунелів значною мірою виготовлені з дощок, потреба в поверхні через дефіцит колод також нижча. Крім того, покинуті шахти містять зламані ділянки рейок і вагонетку зі скринями з ресурсами. Ці рейки можна знову зібрати в цілі доріжки для транспортування ресурсів. Один із способів уникнути втрати — це просто вийняти все з тунелю (опори, рейки тощо), залишивши лише звичайний тунель 3×3. Це набагато простіше згадати, де був гравець, хоча це займає трохи більше часу (і використовує багато осей). Тут також дуже допомагають знаки та інші маркери. Оскільки огорож численні (ті знову підтримують), і гравці можуть використовувати їх, щоб перекрити недосліджені або небезпечні ділянки або спавну павуків.
Печери під піском[]
Якщо гравці перебувають на місцевості з піском або гравієм, як пустельний біом, вони можуть зламати пісок або гравійні блоки і побачити, чи проваляться інші блоки. Якщо деякі блоки впали, то це означає, що під ними щось є. Також опалий пісок або гравій можуть покривати руди. Ще є вірогідність, що під піском є лава. Це найчастіше зустрічається під горами. Також під піском може бути підземелля, тому будьте готові до бою чи відступу.
Список предметів для походу у шахту[]
- Кайло. Якщо вперше йдеш у печеру, використовуйте дерев’яне кайло, щоб видобути трохи кругляка та зробити кам'яне кайло. Якщо вони будуть далі в грі, і очікують, що деякий час добудуть, принесіть два залізних кайла і принаймні 12 кам'яних цеглів. Якщо гравці знайшли діаманти, вони також можуть використовувати діамантове кайло. Після того, як гравець дістався до діамантів, якщо у нього є ефективний стиль шахтування на глибині, де діаманти знайдені, він може використовувати діамантове кайло, яка триває довгий час і здатна видобувати обсидіан. Навіть часткова жилка зазвичай забезпечує достатню кількість діамантів, щоб замінити кайло, коли вона зламається, або відремонтувати її, коли ламається. Якщо вони вважають за краще економити цінні матеріали, візьміть кілька кам'яних цеглів для видобутку каменю та один залізний кирпіч лише для видобутку руд.
- Лопата. Маючи хоча б одну залізну лопату, можна швидко проникнути через громіздкі жили землі та гравію, не користуючись руками. Так само працює одна-дві кам'яні лопати, якщо гравці хочуть використовувати праску для інших речей. Пізніше діамантна лопата — це приємна зручність.
- Смолоскипи. Світло — запорука виживання. Принаймні рекомендується повний стак, і чим більше гравець може перенести, тим краще. Освітлення області навколо може допомогти гравцям дізнатися, які райони вони досліджували та не загубитися, звести нерести монстрів до мінімуму та знайти приховані руди у тіні. Пальники також можуть бути використані для відключення хабарів, що дають змогу, дозволяючи згодом їх перетворювати на дроп.
- Колода. Якщо у гравця не вистачає інструментів чи смолоскипів, гравець може зробити верстак та палички, щоб поповнити запаси кайлів, лопат та смолоскипів (гравці можуть отримати більше вугілля для їх видобутку). Гравець може взяти з собою верстак, коли він закінчиться, або залишити його і перетворити його в основу міні-бази. Що стосується смолоскипів, якщо у гравців також закінчиться вугілля, вони можуть спалити колоду, щоб зробити вугілля заміною.
- Відро води. Це корисно для врятування життя гравця та його предметів, якщо гравці натрапляють на лаву. Крім того, якщо гравці натрапляють на озеро лави чи басейн, який вони хочуть перетнути, вони можуть залити його, щоб перетворити лаву на обсидіан. Також можна поставити воду для створення водоспаду, для спуску будь-яких валів або ярів, на які гравець натрапив. Більш досвідчені гравці також можуть замінити відро з водою для сходів.
- Порожнє відро. Запасне відро корисно для збору лави для використання в якості палива в пічі, для блокування чи забою мобів (гравець втратить більшу частину свого дропу) або просто для того, щоб вивести лаву з шляху. Гравець також може використовувати його, щоб забрати більше води з джерела, можливо, після розміщення водоспаду. Друге відро з водою також дозволяє гравцям створювати вічний водний басейн, з якого вони можуть потім заправляти одне чи обидва відра, коли гравці захочуть. Найпростіший спосіб зробити нескінченне джерело води — зробити ями розміром 2×2 на один рівень глибиною, а потім спорожнити два відра з водою в протилежні кути. Це дозволяє гравцеві поповнити відро з будь-якого з блоків пулу.
- Їжа. Тривалі відвідування шахт зношують голодування гравця. Принесення їжі дозволяє гравцеві проводити більше часу в печерній системі, а збереження голоду є повноцінним для оздоровлення. Якщо є гриби, вони можуть нести або робити миску для приготування тушкованих грибів.
- Зброю: Меч (кам'ний або краще), лук і велика кількість стріл (за винятком випадків, коли їх лук має Чарівність Нескінченності, у такому випадку беріть лише одну стрілу.) Ці гравці допомагають захищати себе від мобів. Оновіться до діамантового меча, як тільки гравці зможуть, оскільки це робить сутички помітно коротшими.
- Броня. Це захищає гравців від мобів, з якими вони можуть зіткнутися, і навіть від лави. Взагалі гравці беруть хоча б залізну броню — при необхідності гравці можуть виплавляти руду і виносити свої броні в печерах.
- Скрині безцінні при дослідженні печер лави, оскільки гравці можуть зберігати свої предмети на випадок, якщо вони померли; замість того, щоб втратити цілий стос заліза та пів стопки золота разом із усією їжею та зброєю, вони можуть скинути скриню та верстак поблизу, і втратити лише свій поточний інструмент та все, що вони ще не приховували. Варто записати координати місця, про всяк випадок.
- Драбину. Бо коли гравці впали і не можуть піднятися. Також корисно для виходу на високі тунелі та блокування затопленої води.
- Таблички. Вони корисні для позначення напрямків у печері. Залиште повідомлення або стрілки ASCII для програвача, наприклад "EXIT -->", "Base with Bed ^", "Zombie spawner this way" або "mind the holes!". Таблички можна складати, що значно переносить подачу. Таблички також можуть блокувати воду та лаву.
- (Необов’язково) Паркани. Корисно не тільки для блокування недосліджених проходів, але для утримання водоспадів та річок, коли гравці не можуть подолати джерело. Як зазначалося вище, гравці також можуть збирати їх у покинутих шахтах.
- (Необов'язково) Маркери різного типу. Крім вищезгаданих табличків, вовна доступна рано, а червоний камінь з’являється, коли гравець заглибиться досить глибоко. Якщо у гравців є гарбузи, джек-ліхтар забезпечують як світло, так і напрямок.
- (Необов’язково) Земля, кругляк, гравій. Гравці, безумовно, збирають деякі з них по дорозі, але, починаючи з деяких дешевих блоків, дозволяють гравцям пробивати ями, робити швидкі сходи, перекривати лаву і проходити дорогу через ями та яри, якщо сходи занадто дорогі або забирають багато часу.
- (Необов’язково) Насіння пшениці та саджанці. Гравці можуть створити підземну ферму дерев, щоб поповнити запаси гравця з колоди та невелику пшеничну ферму для постійного вирощування пшениці на хліб, дозволяючи гравцям залишатися під землею протягом нескінченного періоду часу. Вони повинні бути побудовані у безпечній, добре освітленій зоні, щоб запобігти спавну ворожих мобів та заохотити зростання.
- (Необов’язково) Двері. У поєднанні з твердими блоками дерев'яні двері можуть використовуватися для тимчасового перекриття невивчених печер та запобігання потрапляння ворожих мобів у захищену зону. Рецепт виготовлення дерев'яних дверей створює три двері з шести дерев'яних дощок, тому кожна дверцята використовує дві дерев'яні дошки — те саме, що потрібно для перекриття отвору 2х1, але з можливістю пройти крізь легкість і повернутися, якщо з іншого боку є велика кількість мобів. Деякі зомбі можуть пробити дерев'яні двері, і це слід враховувати, граючи на складному рівні складності. Після нейтралізації ділянки двері можуть бути видобуті та розміщені глибше в печерній системі, або залишені як маркер/прикраса, а також захист від вибуху несподіваного кріпера, роблячи ділянку печери знову небезпечним.
- (Необов’язково) Ліжко. Розміщення ліжка навколо може бути корисним, коли гравці можуть потрапити в пастку в печеру або яр, якщо гравці будуть на поверхні в нічний час. Наявлення ліжка може допомогти їм створити базовий табір, якщо вони знаходяться далеко від дому, а околиці наповнені ворожими мобами чи іншими небезпеками. З ліжком гравці можуть спати і уникати небезпеки вночі та безпечно повертатися додому цілим шматочком.
- (Необов’язково) Щит. Може використовуватися для блокування атак.
- (Необов’язково) Палички, щоб можна було створювати смолоскипи та зайві кайла, не повертаючись до їх бази, щоб дістати палички.
- (Необов’язково) Сільське господарство — це лише у випадку пасток у шахті. Починаючи з 4-х насіння землі та пшениці, смолоскипів та води, побудуйте міні-ферму і на всякий випадок скелет на вас нападе, отримайте кісткове борошно, щоб оновити, виростити та розширити своє господарство.
Шахтний видобуток[]
Також відомий як "Вертикальний видобуток", Шахтний видоубток складається з риття власних тунелів гравця для викриття прихованих ресурсів. Звичайне попередження для копання застосовується: Слідкуйте за виведенням лави чи води або зануренням у глибоку шахту або заселену печеру. Роблячи це, будьте обережні, оскільки гравець може видалити блок, який стримує лаву або відокремити їх від падіння або ворожих мобів.
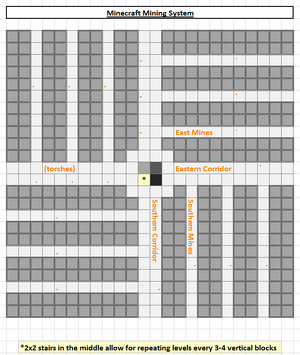
Простий шахтний спуск[]
Простий спуск — це спуск 3 на 3 або 4 на 4, який має сходи збоку. Гравець може побудувати кілька основ в середині, зробивши скляну підлогу і розширивши отриману кімнату. На наступних схемах показано, як виглядає:
Кімната шахти
Сходи[]
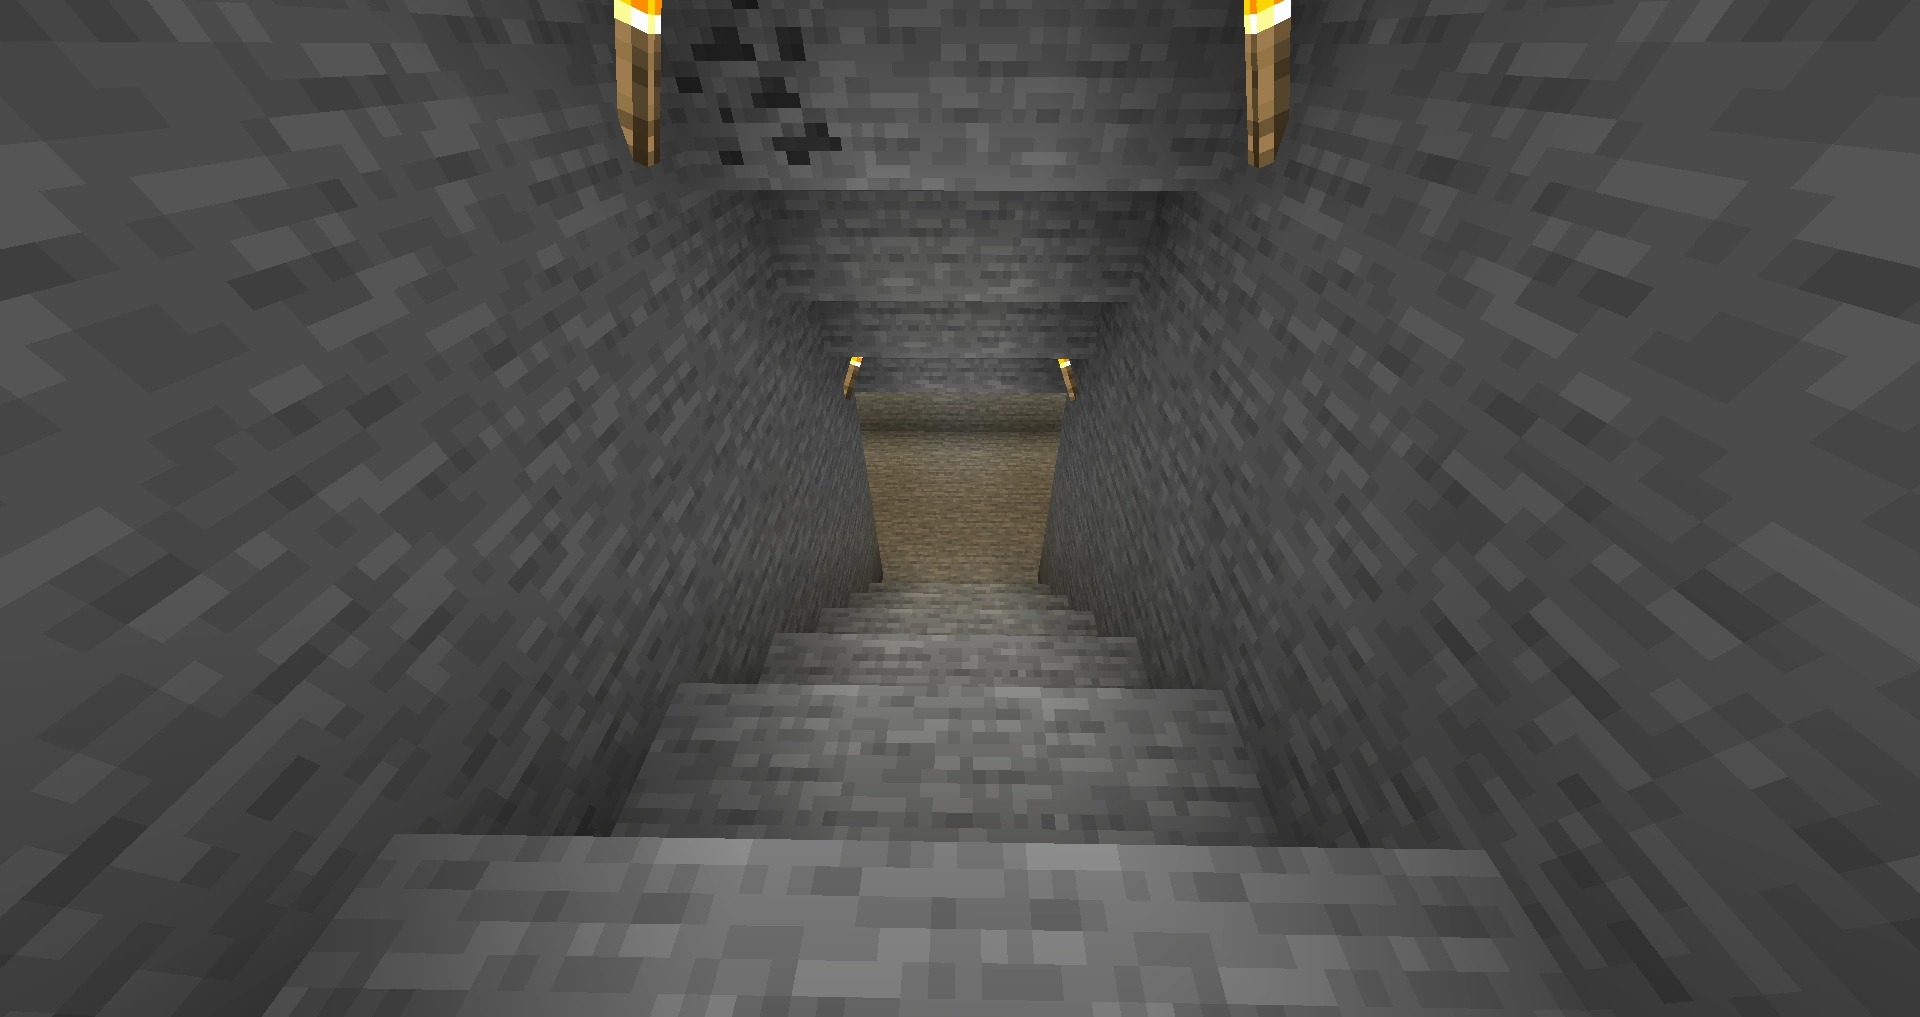
Східна шахта
Перевага сходів полягає в тому, що гравець завжди може тривіально підніматися назад вгору, не потребуючи розміщення сходів. Переміщення частини заготовленого з каменю в сходи робить спуск вниз і вгору ще простішим, не стрибаючи, хоча їм потрібно вирізати додатковий блок заголовка. Будь-яка така сходи падає не більше 1 блоку на кожні 3 викопані блоки (без оголовка). Можливі кілька видів:
Прямі сходи[]
Пряма східна голова вниз, але також над. Це може бути або не корисно — з картою гравець може дізнатися про більшу частину поверхні, під якою вони перебувають, але якщо їм потрібно буде викопати інший шлях, вони можуть вийти на невідому територію. Крім того, довгі сходи з їх бази може вивести їх із діапазону оновлень з їхньої бази, або, принаймні, досить далеко, що подальше розвідка «'» виведе їх поза зоною дії. Тоді їх урожай не буде рости і так далі, поки вони видобувають. Все це може бути шириною 1, 2 або навіть 3 блоку.
Найбільш основна стратегія полягає в руднику по прямій під кутом 45° вниз, переміщаючи по одному блоку на кожен блок вниз. Якщо гравець викопає чотири блоки над кожним кроком замість трьох, піднятися назад вгору простіше, оскільки вони не будуть "вдарятися головою" при кожному стрибку вгору по сходах. Розміщення смолоскипа кожного п’ятого блоку допомагає гравцеві стежити за їх висотою та підтримувати гідний рівень освітлення.
Крім того, гравець може копати по діагоналі. Облиміться до кута, і уявіть, що кутовий блок є відсутнім блоком куба 2×2×2. Тепер викопайте той кубик. Повторіть, додаючи смолоскипи на кожному кроці. Це вимагає більше зусиль для кожного рівня, який випав, але створює більше блоків на шляху.
Вони також можуть копати дрібніші сходи, по два блоки вперед на кожен блок вниз. Це відводить гравця ще далі від горизонталі, але значно полегшує рух поїздів з вагонетками по сходах.
Ґвинтові[]
Ґвинтові сходи трохи складніші, оскільки вони мають часті повороти, але мають перевагу вести прямо вниз, тим самим залишаючись у тому ж чанку. Це дає гравцеві більш цілеспрямоване копання, і він може швидше та безпечніше дістатися до основи, ніж прямі сходи.
2×2 гвинтові сходи[]
Починаючи з плоскої підлоги, викопайте один блок попереду гравця, потім викопайте 2 блоки праворуч від цього. Потім рухайтесь вперед на перше місце, яке вони викопали, поверніть праворуч до другого кроку праворуч, а праворуч копайте блоки «3» вниз від підлоги. Четвертий крок ставить їх під початкову підлогу — залиште блок підлоги, щоб він став стелею, і викопайте три блоки під ним до нового кроку. Продовжуючи цю схему, зверніть увагу, що кожен виток сходів стає стелею для наступного повороту. Ця конструкція скидає 4 шари за повний оборот, але якщо вони натрапляють на гравій, гравцям потрібно помістити землю або кругляк, щоб замінити її на сходову клітку. Якщо повернути праворуч, утворюється спіраль за годинниковою стрілкою, вони, звичайно, можуть піти іншим шляхом по сходах проти годинникової стрілки.
3×3 гвинтові сходи[]
Одна конструкція — горизонтальна сітка 3×3. Викопавши по черзі один блок вниз і перемістившись по периметру зони 3×3, вони залишають достатньо місця для голови, коли рухаються вниз по сходах. Вони також можуть додати сходові блоки до цієї установки. Вони необов'язково можуть залишити центральний стовп для загородження або розмінити його, щоб розмістити сходи для швидкого проїзду. Замість драбин вони могли використовувати водоспад, але вони повинні були це зробити після того, як «закінчити» сходи (копати зайву яму під дном колони, щоб запобігти затопленню). Гравцям також доведеться час від часу виходити з води, щоб дихати. Для довгих сходів гравцеві знадобиться 2 або 3 блоки глибокої води. Крім того, вони можуть видалити центральну колону сходів, коли гравці закінчать, і залити дно, щоб вони могли стрибнути на неї і заощадити час на спад.
Основна конструкція скидає 8 шарів за повний оборот. Вони могли «побудувати» це як дрібніші сходи (4 шари на оборот) для вагонетків, але у мінних візків виникають проблеми з кутами в будь-якому випадку через скелю навколо них.
5×5 гвинтові сходи[]
Це схоже на 3×3, за винятком того, що гравці викопують край сітки 5 на 5. Центральний стовп очищається, виступаючи як запас світла на шляху вниз. Середина виступає в якості запобіжного бар'єру, а зовнішнє кільце має самі сходи. Середина також може бути порожнистою (копання прямо вниз повинно бути безпечним до тих пір, поки гравець не знайде ні печер, ні басейнів з лавою, оскільки зробив сходи), а в ній може бути розміщена драбина або водоспад з отворами в різних рівні для швидкого та легкого доступу. Зауважте, що сходи по сходах не виснажує голод, на відміну від ходьби та стрибків, що використовуються для подорожі зовнішнім кільцем. Плавання виснажує голод, але оскільки у них менше відстані для подорожі, вони все одно виходять попереду.
Ця конструкція опускає програвач на 16 шарів на кожному повороті та забезпечує розвідувальне копання в більш широкому регіоні. У той же час у неї більше шансів пропустити речі між спіралями.
Додаткові сходи
За допомогою вала 4×4 або більше можна додати дві сходи на протилежних сторонах валу, що йдуть в тому ж напрямку за годинниковою стрілкою, що дозволяє додавати горизонтальні «супутникові вали» на кожен прохід сходів на протилежних сторонах, якщо вал, що дозволяє для надзвичайно ефективного та вичерпного видобутку, а у сходах розміром 5×5 і більше, сходи можуть бути додані з кожної сторони валу для ще більш продуктивної шахти.
Кімнатна спіраль[]
Це варіація спіралі, яка складається з спіралі 5×5 кімнат, що ведуть вниз. Просто копайте пряму сходинку на короткий час, а потім викопайте кімнату розміром 5×5 і додайте смолоскип чи два. Поверніть праворуч або ліворуч, і на короткий час викопайте іншу сходинку, і викопайте ще кімнату розміром 5×5, додайте смолоскип тощо. Пам'ятайте, що завжди повертайте однаково. Цей метод дозволяє гравцям знаходити велику кількість руд. Якщо ви потрапили в корінну породу, не хвилюйтесь, поверніться до першої кімнати і поверніть на протилежний час цього разу. Це дуже корисно, якщо гравці хочуть уникати лави та щось подібного. Він також має тенденцію відкривати підземні печери, які завжди добре забезпечені рудами. Просто пам’ятайте, щоб бути обережними до мобів, тому завжди приносьте меч, використовуючи цей метод.
Добування вертикальних шахтів[]
Вертикальні шахти — видобуті вертикальні тунелі, які використовуються для доступу до підземних шахтних-майданчиків. Вони можуть бути будь-якої ширини, починаючи з (якщо гравець божевільний) 1×1 блоків. Не забудьте тримати відро з водою і стопку блоків у своєму хотбарі, щоб швидко впоратися з лавою.
1×1[]
Також відомий як "Копати прямо вниз" і Не роби цього. Незважаючи на те, що 62% шансів потрапити в землю і 27% висадитися в печері, гравець має приблизно один десятий шанс потрапити в небезпечні місця, як лава (8%) або равніни (3%) (100 тестів). Якщо вони абсолютно повинні бути божевільними, спробуйте це: поставте ліжко і скриню вгорі. Спати в ліжку, і все, що є від їх інвентарю, покладіть до скрині, крім кайла, драбин, стопки кожного гравію та кругляка та, можливо, деяких смолоскипів. Копайте вниз, поки гравець не помре або не досягне своєї цільової глибини, розміщуючи сходи над гравцем під час руху. Кожні 5 рівнів або близько того, виріжте 2-блок високий опор навпроти драбини. Якщо вони потрапили в печеру і вижили, стовп відскочиче назад до отвору, з якого випав гравець, та/або побудував кругляк перед гравцями, і поставив на це сходи. Якщо вони потрапляють у печеру і гинуть, опори можуть дати їм зламати сходи під нею, щоб вони могли скинути гравій на стовп і, можливо, витягти будь-яку руду, яку вони знайшли на шляху вниз, але стежте за ворожими мобами. Якщо гравець потрапив у лаву, вони можуть забути про руду, але, можливо, вони можуть вилити воду, щоб загасити лаву.
Зробити цей метод можна безпечно, але це дуже трудомістко. Це те саме, що і раніше, за винятком утримування ⇧ Shift, щоб чіплятися за сходи під час видобутку вниз. Таким чином, якщо вони потрапляють у яму або лаву, вони не потраплять у неї, якщо вони не стримують ⇧ Shift (⇧ Shift не дозволять гравцеві рухатися вниз по сходах, але робить швидкість видобутку повільніше). Якщо гравець знайде печеру, він може трохи піднятися вгору, вийняти останню драбину, яку гравець поставив, і поставити туди відро з водою. Тепер вони можуть плисти вниз, і якщо під гравцем виявилася лава, вона перетвориться на обсидіан і стане нешкідливою. Вони також можуть викопати 1 глибокий і 2 широкі пилки в бік, даючи їм місце, щоб поставити смолоскип, а головне викопати нору глибше, наскільки вони можуть дістатися "без" тримання на драбині.
Зауважте, що видобуток "вгору" в шахті 1х1 насправді може бути більш безпечним, "якщо" гравець розміщує сходи під час підйому вгору. Лава буде перекрита драбиною, яка не може згоріти (і навіть якщо це можливо, немає місця для появи пожежного блоку).
1×2[]
- Виберіть місце, де гравець хоче копати.
- Роздобуйте перший блок, що прилягає до блоку, на якому вони стоять.
- Шагніть вниз.
- Роздобуйте блок, на якому стояв гравець, і один під ним.
- Розмістить сходи в кожному блоці, пропустіть цей крок, якщо гравець хоче розмістити ліси.
- Перейдіть до кроку 2.
- Продовжуйте за вищезазначеним шаблоном, поки вони не досягнуть бажаної глибини. З цього моменту використовуйте горизонтальний метод видобутку на свій вибір. Поставте ліси, якщо гравець не хоче розміщувати сходи.
Простіший варіант[]
- Виберіть місце, де гравець хоче копати.
- Встаньте на розділову лінію між двома блоками.
- Роздобуйте два блоки, на яких вони стоять, готові зупинитись, якщо це буде потрібно.
- Розмістить сходи в кожному блоці.
- Перейдіть до кроку 1.
- Продовжуйте за вищевказаним шаблоном, поки гравець не досягне бажаної глибини. З цього моменту використовуйте горизонтальний метод видобутку на свій вибір.
1×3[]
Подібно до 1×2, але у гравців є більше місця для розміщення смолоскипів, драбин чи опор, якщо вони впадуть зі сходів. Вони також отримають більше попередження про гравійні маси, печери або лави, та додатковий блок для вирішення проблем. Це відносно безпечно, і це хороший спосіб запустити шахту з бази.
Більш розповсюджена версія проводить сходи вниз по середині широкої сторони, тобто кладуться блоки, щоб розбити падіння з обох боків кожні кілька рівнів і на їх рівнях видобутку, але інший спосіб зробити це — поставити сходи на один кінець, і поставити водоспад на інший. Потім вони можуть поставити кілька блоків посередині, щоб запобігти падінню, але залишити багато місця, щоб вискочити з водоспаду, щоб подихнути.
2×2[]
Гравець хоче розкопати один за одним, розмістивши сходи в одному куті блоку. Ця методика є відносно безпечною.
Вертикальна шахта з водним дропом[]
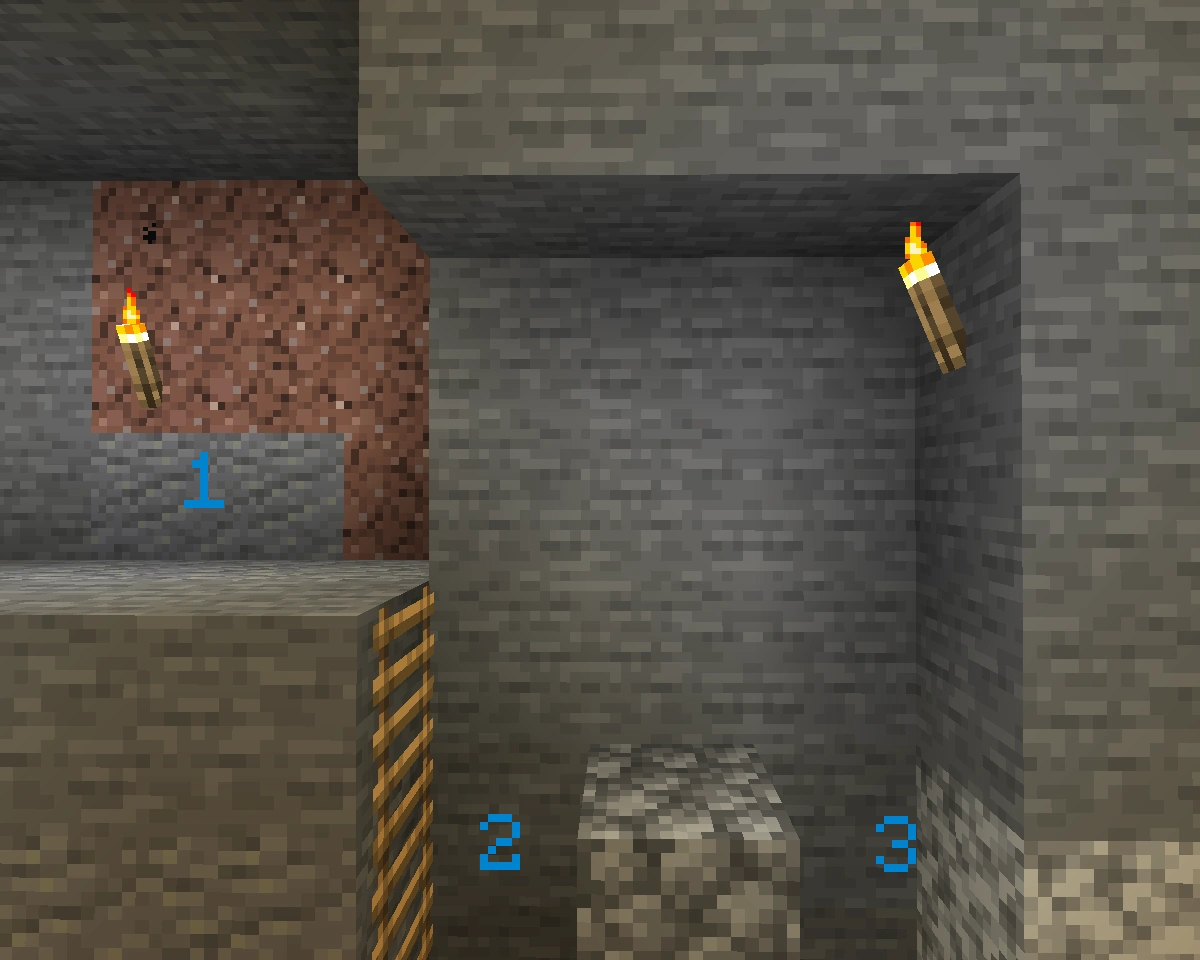

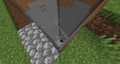
Відріз верхівки шахтного вала. (1) Вхідний прохід (2) Блок підйому (3) Блок спуску.
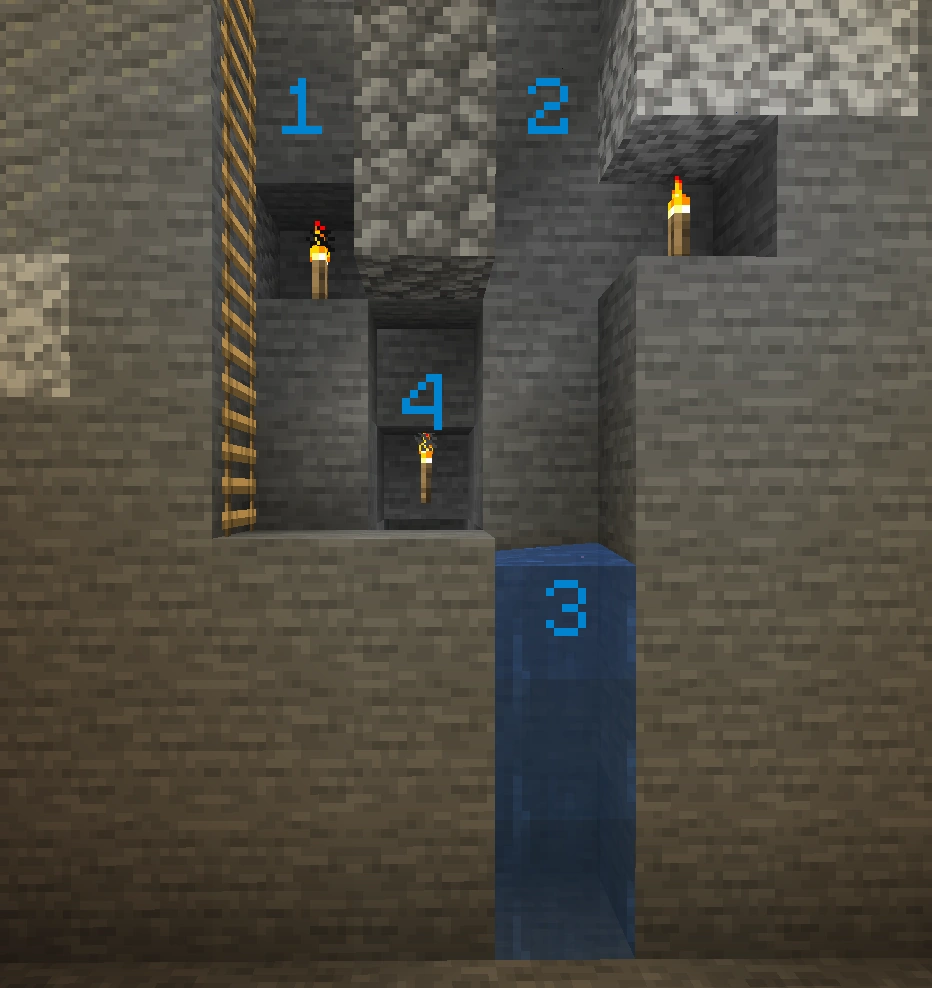
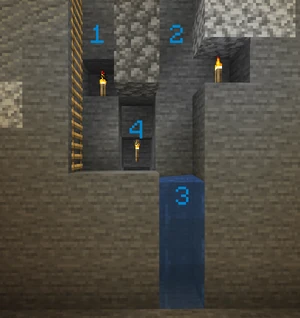
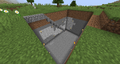
Відріз дна шахти. Зверніть увагу на розміщення смолоскипів у валах для спуску та спуску. (1) Блок підйому (2) Блок спуску (3) Яма для води (4) Бічний прохід до приміщення підсобного господарства/гірничої справи.
Вертикальний вал шахти може бути побудований швидко і дозволяє безпечний, швидкий доступ до найглибших регіонів карти. Щоб спуститися на дно, просто заходьте в шахту. Гравець пройде над шахтного підйому, впаде у шахтний спуску та приземлиться у водойму. Щоб піднятися, піднімайтеся по сходах і вискакуйте.
Цей посібник описує конструкцію вертикального шахтного шахта з такими властивостями:
- Забезпечує швидкий доступ до найнижчих рівнів видобутку
- Швидке будівництво
- Вимагає пристойної кількості колоди
Недоліки:
- Непридатний для вагонеток
Матеріали:
- 64 драбин
- 2 відра з водою
- 20 смолоскипів
- кайла та лопати
Вимоги до колоди складають приблизно 60 блоків колод.
Будівництво[]
Огляд
- Зберіть всі матеріали
- Копайте 3 широку яму до основи
- Копайте підсобне приміщення
- Копайте та заповнюйте водою яму
- Поставте драбину в блок сходження
- Заповнення в центрі вала
Деталі
Спочатку збирайте та виготовляйте матеріали. Обов’язково наповнюйте відра водою. Спуск буде побудована в сторону існуючого приміщення. Почніть з розкопування 3-блокової глибокої альтанки. Якщо верх блоку над землею, він повинен бути оточений парканами чи стінами з лише одним входом на вузькій стороні. Помістіть один смолоскип у кінець альтанки, як показано.
Далі буде викопана 3-х блокова широка яма аж до основи. Не викопуйте блок, на якому стоїть гравець. Викопайте 3-х високий на 2-широкий розділ, а потім заскочіть на нього та викопайте 3-високу колонку, на якій стояв гравець. Розміщуйте смолоскипи з обох боків (підйоми та спуски) через рівні проміжки часу, викопуючи 1 блок для їх розміщення. На валу сходження смолоскипи слід розміщувати в широкі сторони, щоб вони не заважали драбині. У блоку спуску смолоскипи повинні бути розміщені у вузькій стороні, насамперед, щоб гравець міг відслідковувати, яка сторона піднімається, а яка — спуск.
Будьте обережні, викопуючи будь-які блоки біля гравця. Бічні пориви в басейни лави або печери мобів можуть бути небезпечними. Будьте готові заткнути отвір або підскочити і кинути блоки вниз, щоб гравець міг вирватися вгору. Також переконайтеся, що розділ 3х2 не відкрився в печеру, перш ніж гравці скачуть вниз. Тримайте яму добре освітленою. Коли гравці досягнуть рівня основи, зробіть 3-х глибоку яму на стороні спуску. Заповніть середину та сторони підйому за потребою, як на знімку екрана.
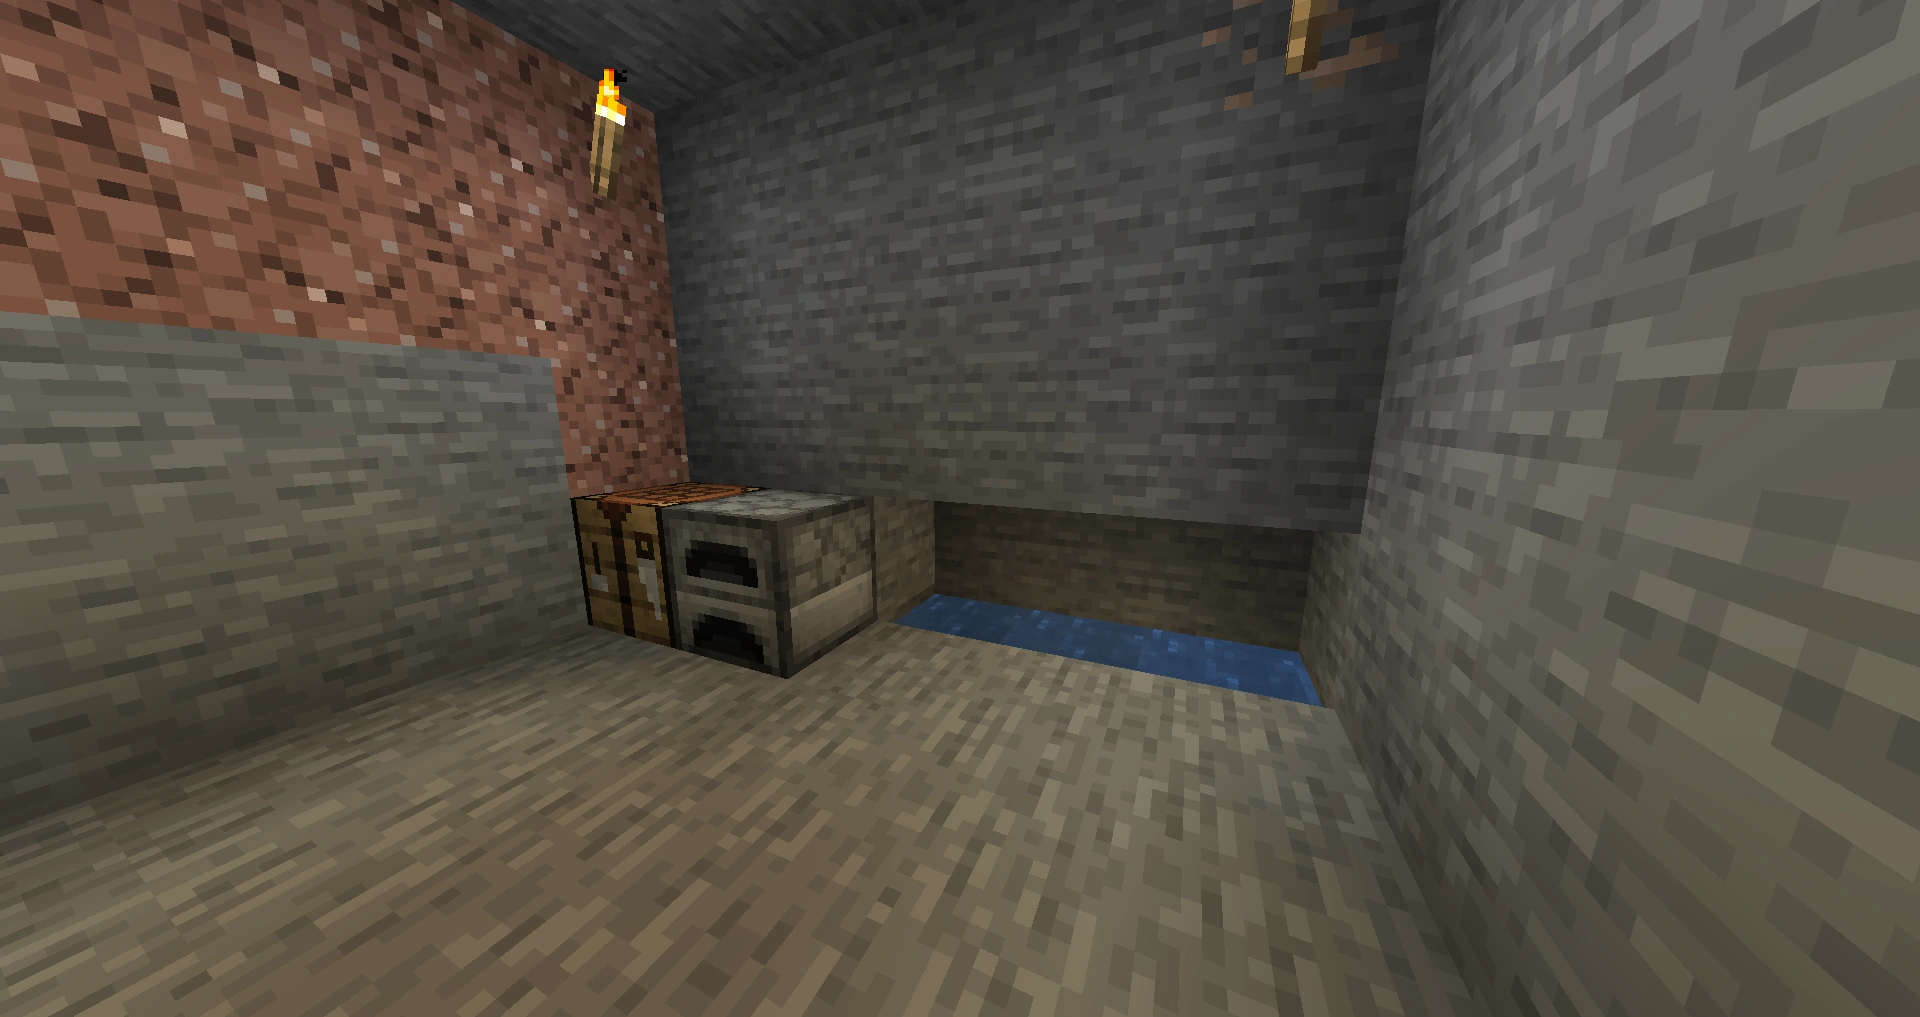

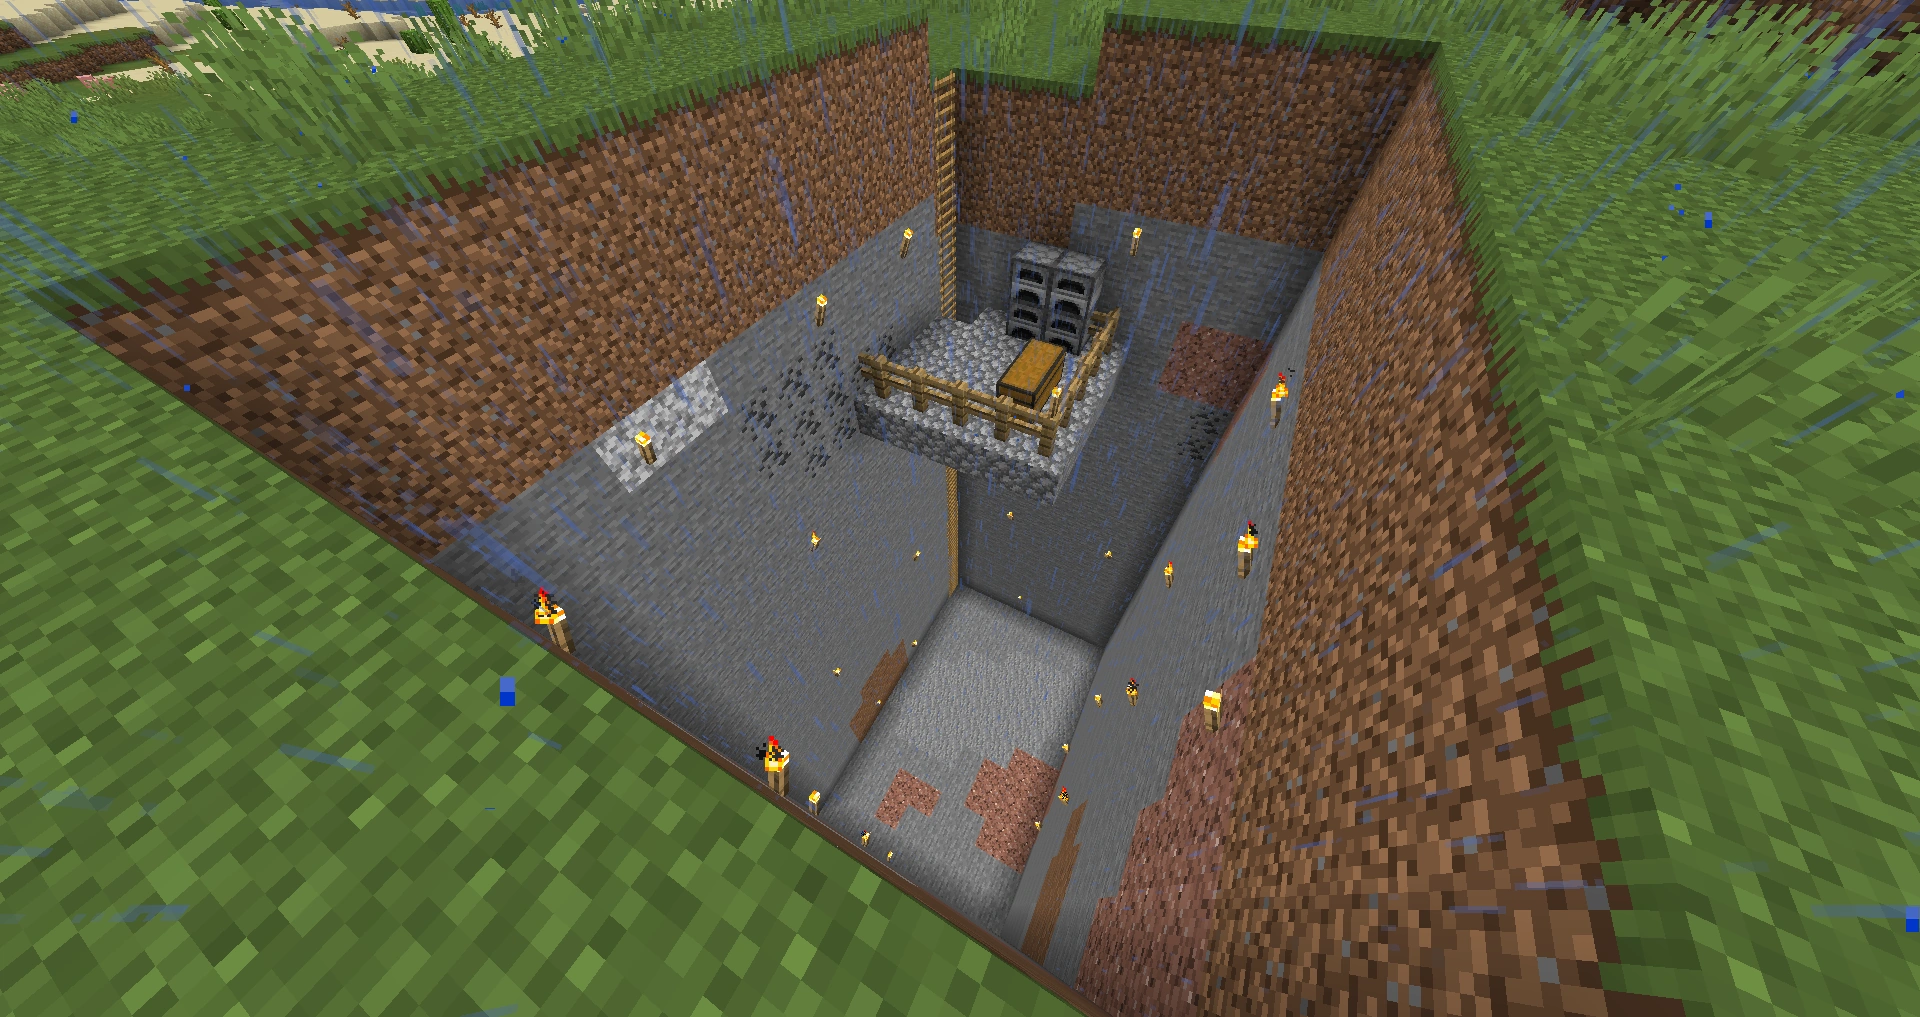
Водойма в господарському приміщенні.
Посередині шахти виріжте боковий блок. Через те, що посадочна яма повинна бути 3 глибиною, вони можуть захотіти сходити декілька блоків у цьому блоку. Далі викопайте підсобне приміщення. Виріжте 3×1 горизонтальне корито в цій кімнаті для води. Опустіть кожне відро до кінця цього. Вода повинна залити її і стати нерухомою.
Знову заповніть відра з центру водойми. Використовуйте воду, щоб заповнити яму на дні блоку спуску. Будьте впевнені, що яма 3 глибока, і кожен блок заповнений водою.
Тепер прийшов час розмістити сходи і залити в центрі шахти. Встаньте у вал підйому і лицьовою стороною від валу спуску. Поставте сходи на стіну перед гравцем і піднімайтеся. Побудуйте драбину аж до верху.
Знову спустіться на дно за допомогою драбини. Будьте обережні, адже центр валу ще не заповнений, і можливо впасти і вмерти. Опинившись на дні, встаньте посередині валу і заповніть його блоками. Підскочіть вгору і покладіть блоки під себе. Коли вони досягнуть вершини, залиште центральний стовп 1 блок під поверхнею (див. Знімок екрана). Залишивши його на 1 блок нижче, гравці можуть увійти у вал спуску просто ввівшись.
Чергова посадка
Замість 3 блоків глибокої посадкової ями, якщо гравці розміщують два блоки води на дні шахти в стелі свого підсобного приміщення на дні та "тримають її на місці" зі знаком на стіні під валом, це перерве їх падіння, коли вони потраплять через нього, і вони приземляються без пошкоджень на дні площі своїх підсобних приміщень.
Горизонтальне видобування (або ресурсний видобуток / стратифікація)[]
Безпека[]
Горизонтальний видобуток не такий небезпечний, як вертикальна. Але є кілька подібних пропозицій. Носіть відро з водою та кілька блоків одного одноразового "незаймистого" матеріалу (наприклад, піску, гравію, кругляка) десь на гарячій панелі гравця. Блок можна використовувати для швидкого включення витоку у випадках лави, а воду можна заливати поверх лави-джерела, щоб перетворити її в обсидіан, а також для гасіння пожеж. (теклива лава, як правило, перетворюється на кругляк, зрідка камінь, якщо вода є джерелом.)
Терміни та визначення[]
Основний вал доступу: в тунелі 1×2 або 2×2 використовується доступ для інших тунелів.
Ефективність: скільки руд отримує гравець за витрачені зусилля, що вкладаються в шахту, або скільки руд і кругляка вони копають, щоб знайти їх.
Ґрунтовність: скільки руд видобуває гравець за чанк.
Компроміс: шахту можна зробити більш ретельною ціною ефективності, або навпаки.
Макет: вид зверху вниз шахти.
Гілка: тунелі, викопані суто для збирання руд.
Довжина гілки: скільки блоків гравець викопує свої гілки. Одна з рекомендацій — виміряти довжину міцністю кам’яного кайла.
Інтервал: як далеко розташовані гілки.
Цілком ретельно: шахта, яка виявляє 4 нові викопані блоки та виявляє кожен блок в межах чанка, є повністю ретельною.
Рівень: «укладання» однієї гілки шахти поверх іншої, щоб отримати набагато більшу ступінь ретельності, не приносячи шкоди занадто великій ефективності.
Ефективність проти ґрунтовності[]
Ефективність видобутку "Minecraft" визначається як кількість руди блокує шахти гравцю, по відношенню до часу, витраченого на їх досягнення. Ґрунтовність — це відсоток руд, який гравець видобув із заданої частини. Ефективність апроксимується блоками, розкритими на видобуті блоки, тоді як ретельність — на рівні блоків, виявлених на блоки. Оскільки обидва включають "виявлені блоки", їх часто плутають.
Якщо припустити, що всі руди спавнятся в 2×2×2 кубики або більше, то не потрібно розкривати кожен блок. Видобуток трьох просторів в ширину, по чотири блоки між кожним валом буде повністю ретельним. Якщо припустити, що 90% руд — 2×2×2, але 10% — 1×1×1; тоді як отримання 100% унітарної ретельності тоді вимагає відстані 3 та відстані шару 2, оригінальна шахта (3-пробільна 4-х рівнева) підтримує ґрунтовність 98%. 100% ретельна шахта потребує видобутку вдвічі більше каменю, одночасно збільшуючи загальний вихід на 2%, що призводить до половини ефективності.
Для того, щоб дати фактичну кількість для ефективності, ми можемо використовувати ефективність = 100x(кількість зібраних руд/кількість видобутих блоків) і, рівнозначно, %ефективність = (кількість зібраних руд/кількість видобутих блоків)
Необхідно зробити кілька припущень:
- Окремо розподіляється випадковим чином
- Рука орієнтована випадковим чином
- Золоте займає певну ширину, завдяки чому два тунелі, що проходять занадто близько один до одного, перетинатимуть одне й те саме рудо тіло двічі.
У Minecraft ці припущення по суті є правдивими, хоча є певне спотворення, оскільки алмази породжуються лише один раз за чанк.
Отже ми доходимо до суті аргументу; інтервал між тунелями. У традиційних "ефективних" методах видобутку тунелі розташовуються близько один до одного, щоб "спостерігати" максимально можливу кількість блоків, тому видаляючи всю руду з району. Отже, розглянемо пробіл у 1; це один тунель, відокремлений одним блоком від іншого тунелю. Під час риття першого тунелю зустрічається кілька рудних тіл. Цей тунель має високу ефективність (насправді максимально можливий ККД, як ми побачимо далі). Другий тунель має дуже низьку ефективність, оскільки майже всі рудні тіла, з якими він стикається, були вже видалені першим тунелем. Це призводить до зниження ефективності роботи гірничих робіт. Відстань до 1 неймовірно неефективна. Тепер ми переходимо до інтервалу 2. Це такий проміжок, який використовує багато людей, оскільки це призводить до 100% спостережуваних блоків в одному шарі. Однак, з інтервалом у 2, другий тунель все ще стикається з декількома рудними тілами, які вже були вилучені, тому він також є досить неефективним. Ми можемо продовжувати так; доки другий тунель має "шанс" зустріти рудні тіла, які вже були видалені сусіднім тунелем, він матиме меншу максимальну ефективність. Звідси випливає, що найефективнішим способом добування шахти є розміщення другого тунелю досить далеко від сусіднього тунелю, щоб "не було шансів зустріти вже вилучені руди".
The problem has been modeled in MATLAB using a 2D slice of a real Minecraft level and a virtual mining procedure. The model mines a 1 block wide tunnel through the 2D layer and removes all diamonds it encounters, just like a real player would do. The model is limited to diamonds but the principle applies to all ores. It repeats the mining for different tunnel spacings, from 1 to 10. The model then records how many diamonds were mined for each case, how many blocks were removed, and calculates the efficiency of each spacing. A simple graph is produced:
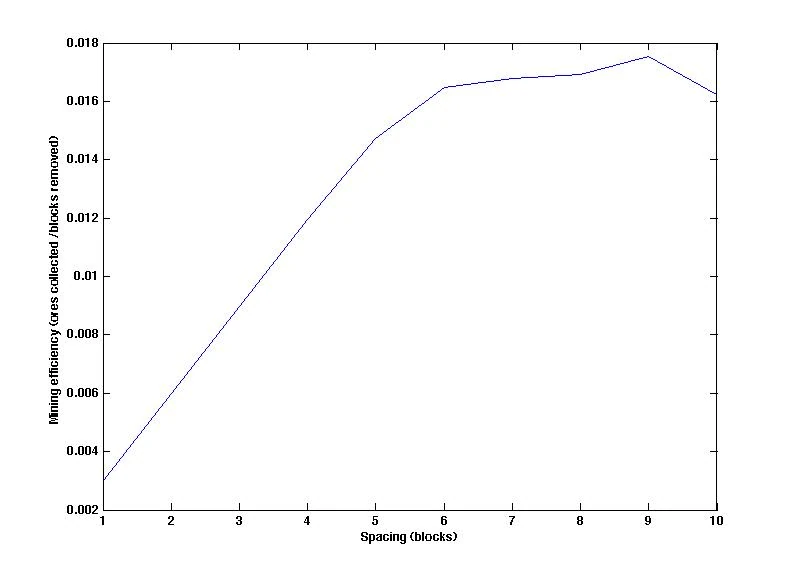
The results indicate what is expected — that when tunnels are close together they are not efficient because the miner will encounter diamonds which were already removed by the adjacent tunnel(s). A maximum efficiency is reached at a spacing of around 6 blocks (that is, 6 solid blocks left in-between the tunnels). At this spacing, efficiency is about 0.017, corresponding to 1.7% of blocks removed being a diamond. At this spacing, the tunnels effectively become independent of each other and so, statistically speaking, the chance of encountering an ore are maximized because there is no chance the ore has been removed by an adjacent tunnel. Above a spacing of 6, efficiency does not increase greatly because ore collection rate is simply a function of the distribution of ores within the level. Note: in the above graph, efficiency appears to drop-off at a spacing of 10. This is simply a limitation of the size of the level used to model the process, resulting in a large error at high spacings. If a larger level were used, the line would smoothly come to a maximum efficiency and stay there.
In summary:
- The term "efficiency" is often applied to the practice of making every block observable, however this is not usually the objective of a miner.
- A more practical definition of "efficiency" describes the percentage of blocks removed that are ores, in other words efficiency = (ores removed / blocks removed).
- Maximum efficiency is reached when adjacent tunnels become independent of each other, since there is no chance that an adjacent tunnel has already removed an ore.
- This maximum efficiency, for diamonds, is reached at a spacing of 6. Since other ores are usually collected in copious amounts compared to diamonds, this spacing is recommended for every-day mining operations.
Branch Mining[]
Branch mining consists of mining out side tunnels from an access shaft to expose as many blocks as possible with a minimum of blocks removed.
Creating a Branch Mine is simple. First, dig deep underground until 0-16 blocks above the bottom level. To keep track of this, press F3, and the Y-coordinate tells the vertical level the player character is currently at (It is best to mine at level 11 because it is easier to deal with lava lakes on that height). Upon reaching the desired level, begin to dig at least 20 blocks into a wall to create a shaft. Come out of the shaft, move at least 3 blocks to the left or right, and do the same again, digging 20 blocks into the wall. Each shaft made will almost always contain a resource block ranging from coal, iron, redstone to even gold and diamond.
There is a tradeoff between the distance chosen for each branch of the mine. A distance of 2 blocks per branch means that players will end up exposing almost every block, but at the cost of a lot of work. A distance of 5 blocks per branch will give them a wider distance covered but there is the possibility of missing some ore veins, especially diamond or lapis lazuli which can appear in veins of less than 4 blocks. Using the diagram titled Better 3 Space leaves no ores hidden, however requires them mine more stone. It is recommended to use this method if they don't mind mining a bit extra and really need the gold, redstone, diamond, iron, and coal.
Layout 1[]
The trade-off for distance can be minimized by making a branch mine a level above and below the branch mine that is offset. (This is a side view) For example:
Offsetting mine levels
Layout 2[]
Another option is the per-chunk branch mine. This is a 2 space branch mine, but is constructed over the space of a single chunk, and is capable of ensuring that every ore deposit is found, while still only mining around 45% of the chunk's stone. For the initial shaft to bedrock for this mine, a 1×2 shaft will fit lengthwise in the central corridor. Also, considering in most cases each chunk have one diamond ore vein, if their only priority is diamonds, they can place the top most branches at level 14 & 15 and dig branches from top to bottom until they strike a diamond vein and then skip the rest of the chunk.
Per-chunk Branch Mine
Layout 3[]
Antennae layout
An effective technique if players want to find rare resources with minimal effort. It is basically mining down to any level, usually to bedrock, and then mining outwards to the sides, much like a tree with a trunk and branches.
- Use the staircase method to dig down to bedrock.
- Go up 2 blocks and fill any space below they have mined out.
- Dig a 3×3 room.
- Dig a straight 2×1 tunnel in a straight line then dig out 32 blocks every 4th block.
- (Optional) If the player don't want to count to 32 every branch, dig out a "Marker" 1×1 tunnel 4 blocks in and stop by it in the next branch.
- To further increase efficiency, the player can end the 20-block tunnel by digging 4 blocks of an 1×1 tunnels as each of the mined block reveals more than a 2×1 tunnel.
This method is based on the relatively low probability of desirable blocks being created without any neighbors, so it will occasionally miss small or narrow ore deposits that fall entirely between the branches, but it covers ground faster, so players will usually get more ore for their time. If the player would rather be sure of 100% coverage, simply place the tunnels closer together. It is also meant to be done quickly.
Diagram:
                           X = Tunnel "Trunk"
                           B = Branch
                           S = Staircase
                           Y = Outpost (for supplies, etc.)
                           - = (Optional) 1×1 block tunnel

          B-------B                 B-------B
          B       B                 B       B
          B       B                 B       B
          B       B                 B       B
          B       B                 B       B
          B       B                 B       B
          B       B       YYY       B       B
X X X X X X X X X X X X X YYY X X X X X X X X X X X X
          B       B       YYY       B       B
          B       B        S        B       B
          B       B        S        B       B
          B       B        S        B       B
          B       B        S        B       B
          B-------B        S        B-------B
Each branch can be any length, but about 32 blocks long is a good length to begin with, as it can be measured with the durability of a stone pickaxe.
Layout 4[]
a pinwheel mine with a spacing of 2
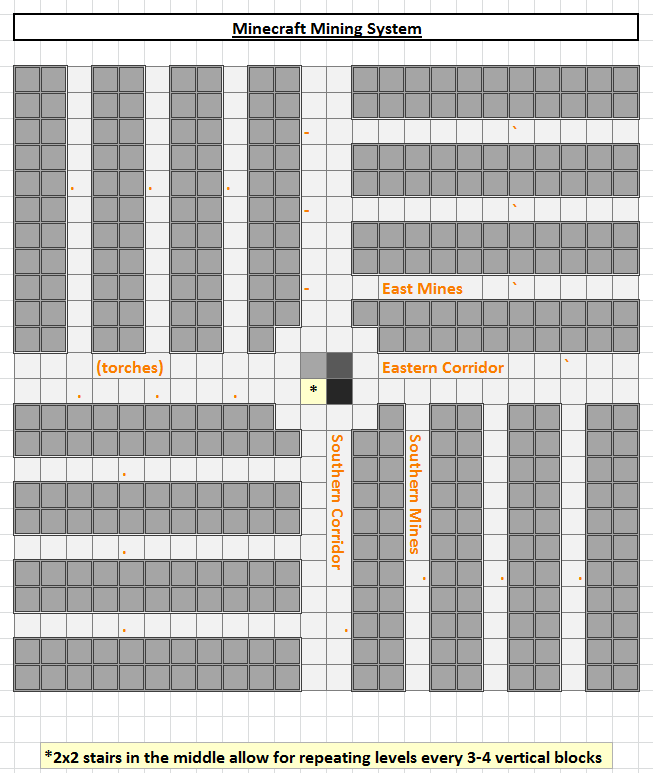
Pinwheel Mining System.
The Pinwheel Mining layout:
The Pinwheel Mining layout is designed to cover large squares of land, over long periods of time.
- Get to the diamond layer by the player's preferred method,
- Dig out a room-as large as 10×10×8 if the player want to set it up as a self-sufficient base, or as small as 4×4×2 if the player just want to get mining, and use even numbers if they like 2×2 access shafts or odd numbers if they prefer 1×2 access shafts.
- Mark the access shafts into the middle of the walls; the picture shows 2×2 tunnels. If players do not use the wide tunnels, mark the main shafts with signposts.
- Dig a given access shaft out until their inventory is full. They'll have plenty of chances to get the ores out of the access shafts.
- Note: If they use a simple straight staircase to get down, they may need to leave off the south tunnel for a while.
- Mark the branches at the desired interval. The picture shows a spacing of 2, which is 100% thorough but inefficient.
- Dig out each branch until their inventory is 3 spaces away from full, then turn around.
- On the way back, place torches in any dark spots, and collect any missed ores — collecting all the coal is advised, but not required.
As always, the player can use any spacing; a spacing of three provides both reasonable efficiency and reasonable thoroughness.
This layout can compete with the phoenix mine in terms of efficiency, and is easier to modify if necessary, but it does require a lot of time for each trip.
Layout 5[]
Room and fork layout
- Dig a room that is 7 blocks long, 10 blocks wide and 3 blocks high. Have their stairway or ladder in the middle of one of the 10 block walls, preferably 2 spaces wide.
- Starting in one of the corners, dig parallel to one of the walls of the room the player just dug for 20 spaces, and place a torch every 5 blocks.
- Then, dig another 20 block tunnel that has two blocks between it and the previous tunnel.
- Continue until the player reaches the other side of the room.
Diagram (dirt: tunnels, stair blocks: a staircase):
By utilizing this variant properly, players can uncover all the blocks in quite a large area, and the mineral yields are quite high. Having the stairs 2 blocks wide allows for thorough strip mining as they can be strip mined around. Also, a good length for each tunnel is 20 blocks long.
Layout 6[]


A branch mine with pokeholes (top view)

The spacing between the branches (11 blocks)
Branch mining with "pokeholes".
A branch mine with pokeholes is a variation on a traditional branch mine, but designed to have a better blocks-revealed to blocks-mined ratio. Like a traditional branch mine, branch mines with pokeholes have several parallel 2×1 shafts that branch out of a main trunk shaft. However, they are much further apart than in a branch mine (11 blocks as opposed to 3). The reason for this is that as player dig the 2×1 shafts, every 4th block forward they have go, they dig a 1×1 hole to the left and the right, revealing many previously hidden blocks. This technique used to be called "feather mining", but after xisumavoid's video covering this method, it's more commonly known as "branch mining with poke holes", or simply "pokehole mining". The mine got its old name from its feather-like shape when viewed in a cave map or with an x-ray resource pack.
Tiered Branch Mining[]

Advanced branch mining is one of the most efficient way to mine 100% of the ores on multiple levels.
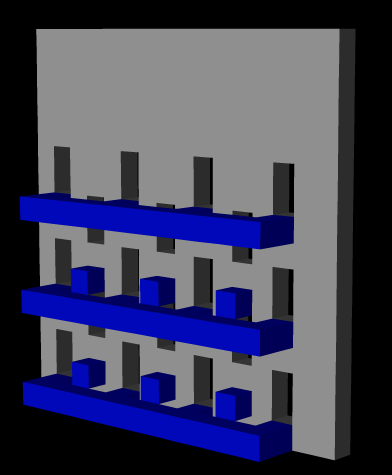
This setup allows for linear navigation along tunnels by first selecting depth, then choosing an appropriate tunnel at that depth.
Tiered branch mining is the art of stacking shaft mines on top of one another.
If the player decide to stack their mineshafts, however, they should use an odd-spacing, or they will get inefficiency and blind spots.
For instance, the following tiering has the advantage of being very thorough, while finding any 2×2×2 cube of valuable ore. It has the disadvantage of missing some of the smaller veins, though it doesn't miss as many as players might expect it yields somewhere between 80 and 90% of the ores in a region.
(mine at y=15, y=11, and y=7)
oxoooxoooxooo
oxoooxoooxooo
ooooooooooooo
ooooooooooooo
oooxoooxoooxo
oooxoooxoooxo
ooooooooooooo
ooooooooooooo
oxoooxoooxooo
oxoooxoooxooo
ooooooooooooo
ooooooooooooo
(bedrock begins.)
(x=branch, o=stone)
This is a good mine for single player if the player can't stand the mere possibility of leaving 2×2×2 cube of diamonds just below or above their initial mineshaft and this will find them.
The next one has a tiering distance of 3, and is noticeably less thorough, but it finds at least 90% of the diamonds in a chunk:
oooxoooxoooxo
oooxoooxoooxo
ooooooooooooo
oxoooxoooxooo
oxoooxoooxooo
ooooooooooooo
oooxoooxoooxo
oooxoooxoooxo
ooooooooooooo
oxoooxoooxooo
oxoooxoooxooo
(bedrock begins)
This is a good mine for somewhat crowded multiplayer, where thoroughness is actually worth something.
Should the player be willing to sacrifice efficiency in exchange for revealing every last block, players can use a tiering distance of 2:
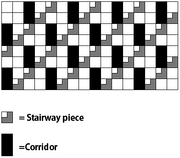
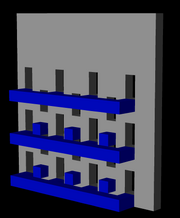
oooxoooxoooxo
oooxoooxoooxo
oxoooxoooxooo
oxoooxoooxooo
oooxoooxoooxo
oooxoooxoooxo
oxoooxoooxooo
oxoooxoooxooo
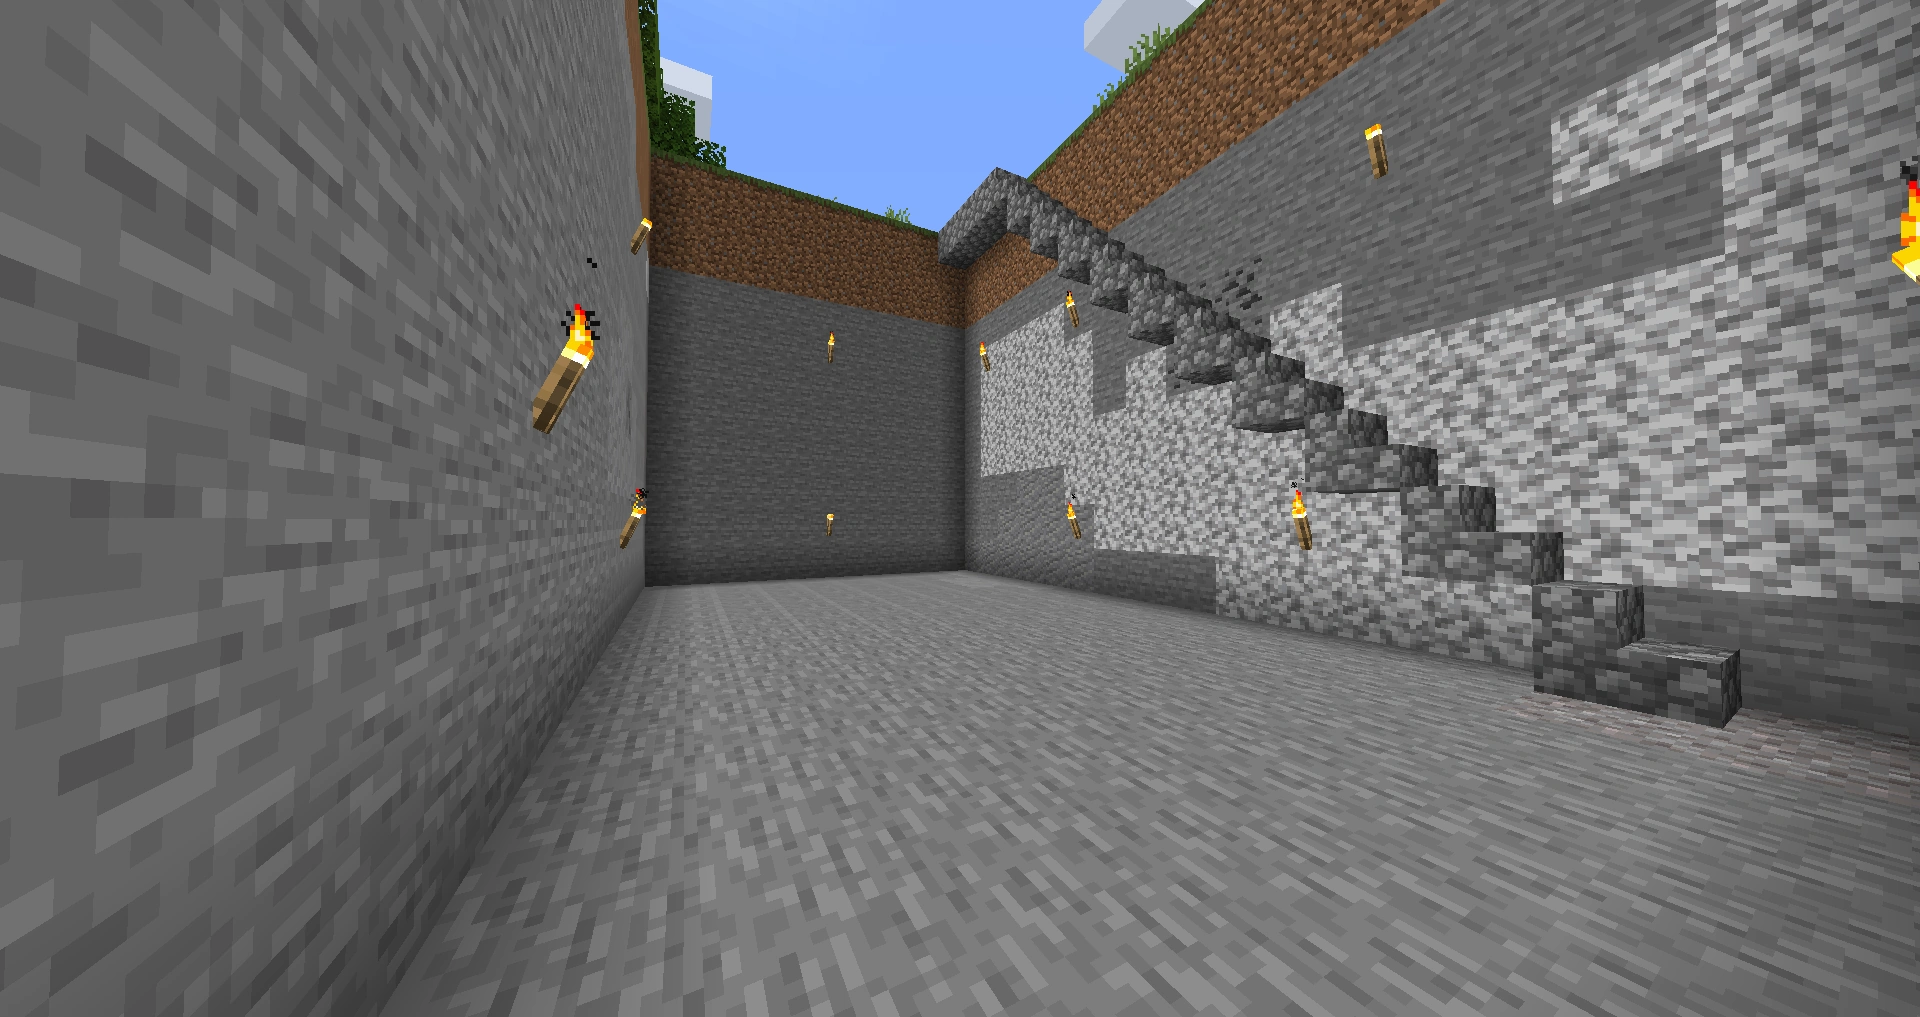
This particular tiering, however, is not only inefficient, but requires one of the access methods shown in the pictures-either an 8 tall, 2-3 wide tunnel with staircases as shown in the gray picture, or with one access shaft for 2 sets of layers. This should be used only in ridiculously crowded multiplayer servers, when what matters is finding that one redstone vein that got missed by all the random-miners.
However, nearly any spacing and layout can be used with a given tiering distance, as it is fairly thorough, only slightly less efficient than a straight shaft, and it can be transformed into nearly any level of thoroughness without wasting effort.
Nearly any layout, spacing, and branch-length can be combined with any tiering distance, though doing it with a phoenix mine on the compact spacing is not recommend for anyone who gets headaches easily.
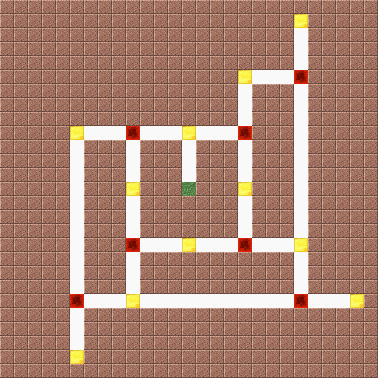
Windmill mining[]
Note: The player will need a basic understanding of Japanese to watch the video, or translation captions will be needed.
Windmill mining is an efficient mining technique invented by a Japanese Minecrafter てりぃ (pronounced like Terry).
Pros:
- Players don't need to count a large number of blocks.
- Players player won't get lost in their own labyrinth.
- Players can easily predict biomes that they are going to mine. If they want to mine emeralds, just choose the center of mountains for their start point.
- It is relatively easy to suspend and resume mining.
- It has the same efficiency as 3 space branch mining.
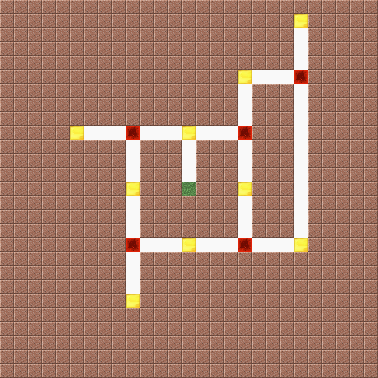
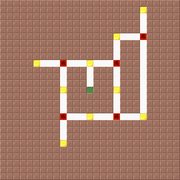
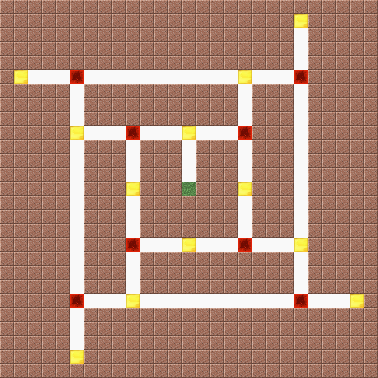
Preparation[]
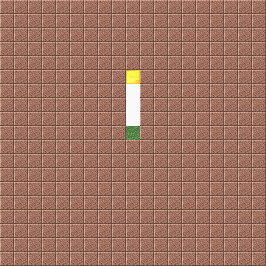
Descend to Y=11, which is 6 blocks above the highest bedrock layer. This is the start point denoted by the grass block.
Dig a 1×2 tunnel of 4 blocks long from the start point, then put a mark there denoted by the gold block.
Don't make it 1×3. That will only reduce the efficiency.
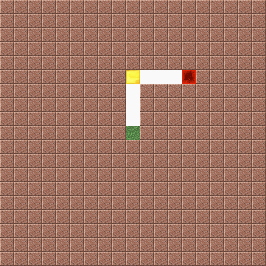
Turn right, dig 4 blocks, then put another mark denoted by the redstone block.
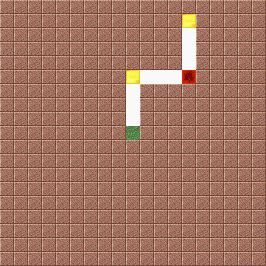
Turn left, dig 4 blocks, then put a mark.
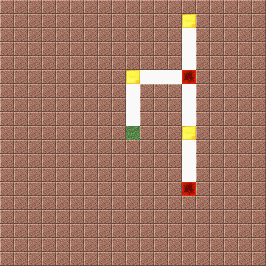
Turn back, return to the previous mark, dig 4 blocks, then put a mark.
Dig 4 blocks and put another mark.
Turn left, dig 4 blocks, then put a mark.
Turn back, return to the previous mark, dig 4 blocks, then put a mark.
Dig 4 blocks and put another mark.
Repeat the previous step.
Repeat the previous step but while the player are doing so, they will reach the mark they have put before. Now the player have completed the first lap.
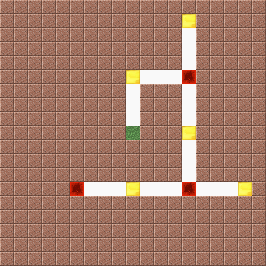
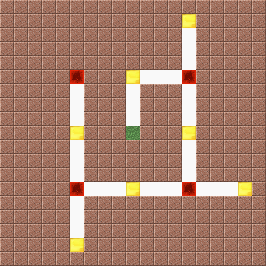
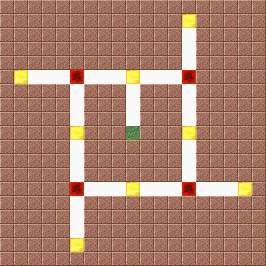
After the first lap[]
Choose one of four corners and go there. Go to the "gold" mark they have previously put.
Turn right, dig 4 blocks, then put a mark.
Turn left, dig 4 blocks, then put another mark.
Turn back, return to the previous mark, then dig a tunnel until they reach the "gold" mark they have previously put.
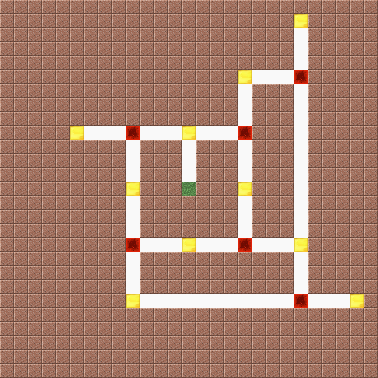
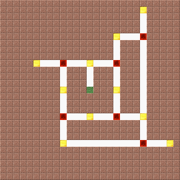
Dig 4 blocks, then put a mark.
Turn left, dig 4 blocks, then put another mark.
Turn back, return to the previous mark, then dig a tunnel until they reach the "gold" mark they have previously put.
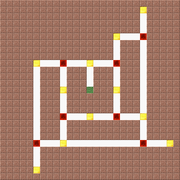
Repeat the previous step.
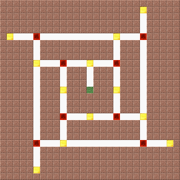
Repeat the previous step. Now they have completed their second lap. Repeat the entire steps until they are satisfied.
Speed Mining[]
Speed mining is a technique of mining in which a player randomly mines out a 50 block radius around them. Using an Efficiency V diamond pickaxe, along with beacons for Speed I/II and Haste II, minerals can be acquired rather quickly. It is at first expensive, but pays off quickly. It is suggested that the player to do this at diamond level.
Best results are obtained by using a diamond pickaxe enchanted with Efficiency V and Silk Touch to mine and collect ores, then smelting the gold and iron and using a Fortune III pick to mine the other ores.
Simple Strip Mining[]
This technique is to take off the top 6 layers of a mountain completely. Continue until the mountain is entirely flat. TNT is useful for the first 5 layers, since the explosion will destroy grass and dirt for the most part.
Diagram:
Key: A = Air
     B = Block
     L = Ground Level
Step 1:
         A A A A A A A A A A
         A A A A A A A A A A A A
       A A A A A A A A A A A A A A
       A A A A A A A A A A A A A A A
       A A A A A A A A A A A A A A A
     B B B B B B B B B B B B B B B B
First 5 layers are gone when the player started mining.
Next couple steps are as shown:
         A A A A A A A A A A
         A A A A A A A A A A A A
       A A A A A A A A A A A A A A
       A A A A A A A A A A A A A A A
       A A A A A A A A A A A A A A A
     A A A A A A A A A A A A A A A A
   B B B B B B B B B B B B B B B B B B
         A A A A A A A A A A
         A A A A A A A A A A A A
       A A A A A A A A A A A A A A
       A A A A A A A A A A A A A A A
       A A A A A A A A A A A A A A A
     A A A A A A A A A A A A A A A A
   A A A A A A A A A A A A A A A A A A
 B B B B B B B B B B B B B B B B B B B B B
This time consuming method is a useful tool for when they need minerals or a flat area.
Quarry Mining[]
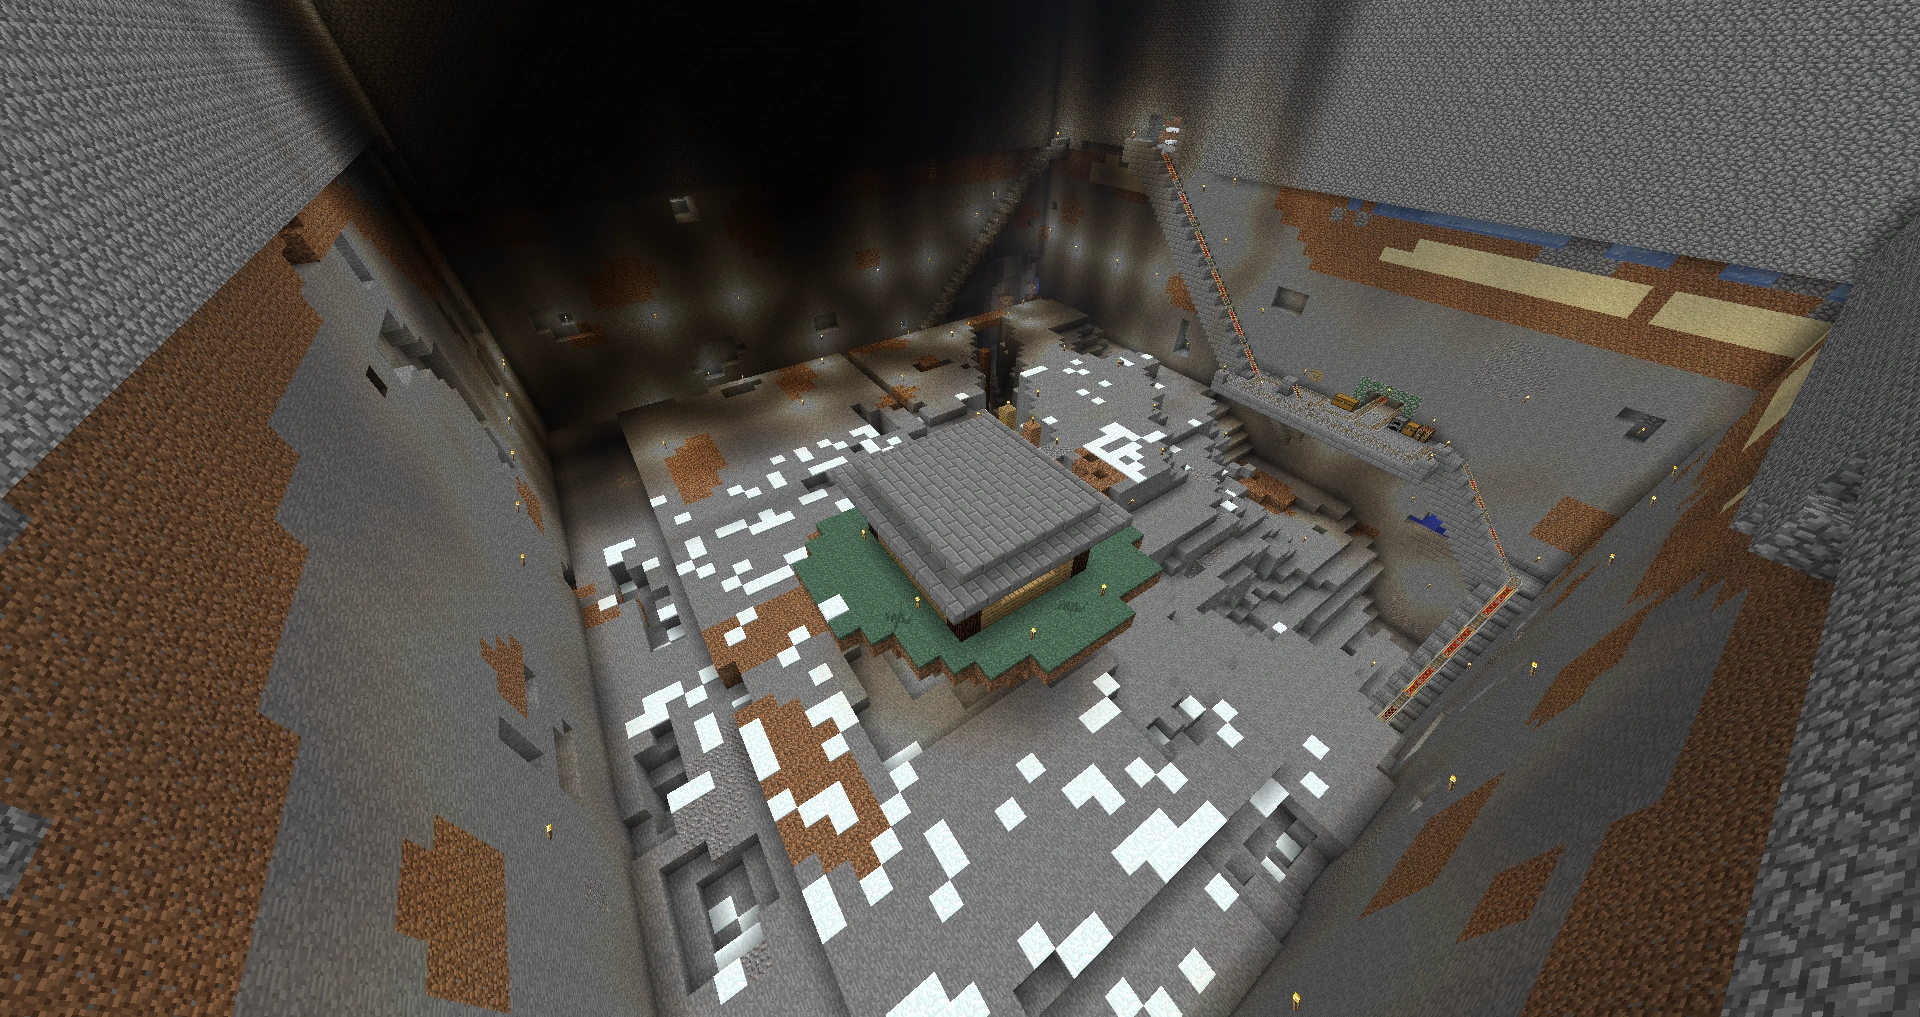
Quarry Mining is very similar to strip mining, sharing the prospect of taking all resources within an area. These mining methods are used very commonly in Minecraft. The difference between quarrying and strip mining is that the process of quarrying involves a large rectangular or square strip, continually mined downwards with a staircase running along the side. This method got its name by its similarity to real world quarry sites. Quarries are typically ceased when a large cave is discovered (This does not directly stop the excavation, it just makes it difficult to continue), the miner abandons the quarry for another project, or bedrock is reached. A way to deal with large caves is to block the cave with Creeper-resistant materials, like obsidian. One can place a (powered) rail in a spiral, to allow ease of access.
A finished quarry with obsidian and lava at the bottom.
A quarry in construction.

A recently begun quarry. There is a convenient, easily accessible ledge with chests, furnaces and a crafting table.

The inside of a quarry.
An elaborate 64 by 64 blocks quarry in the making.
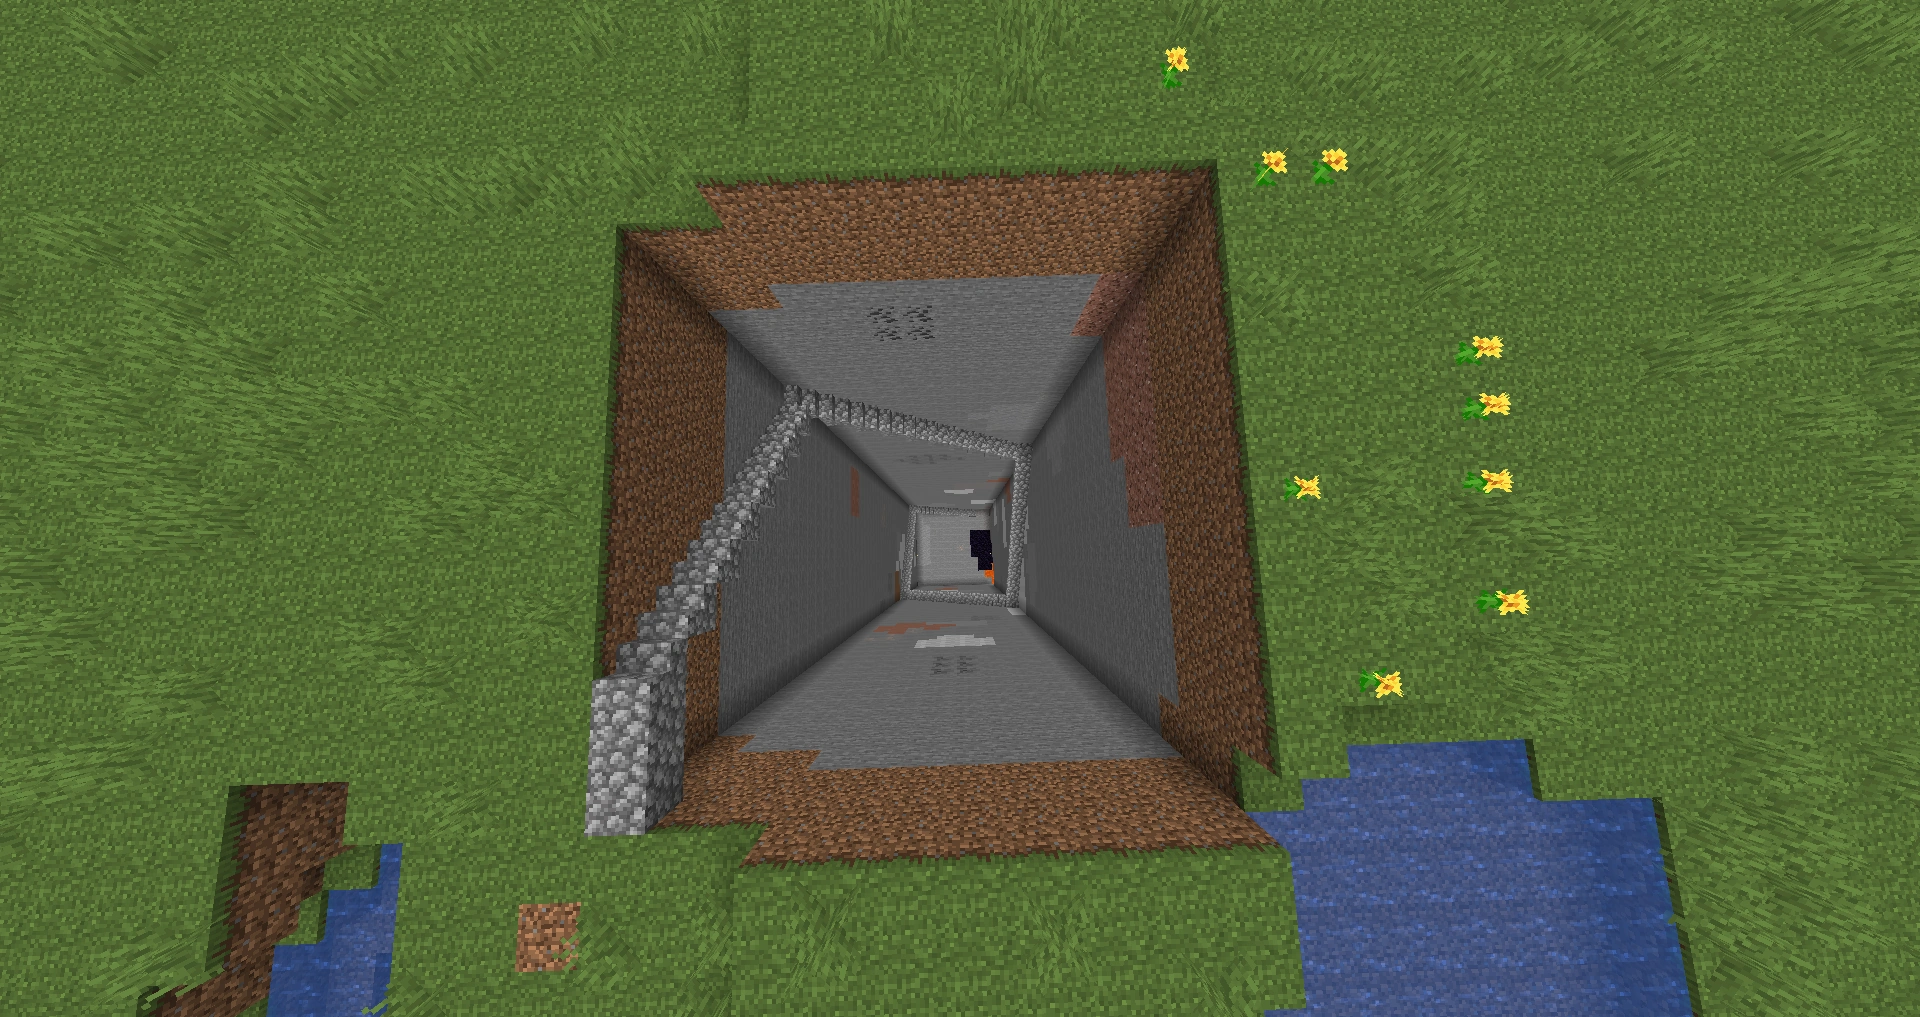
A 16×16 quarry being looked at from the top.
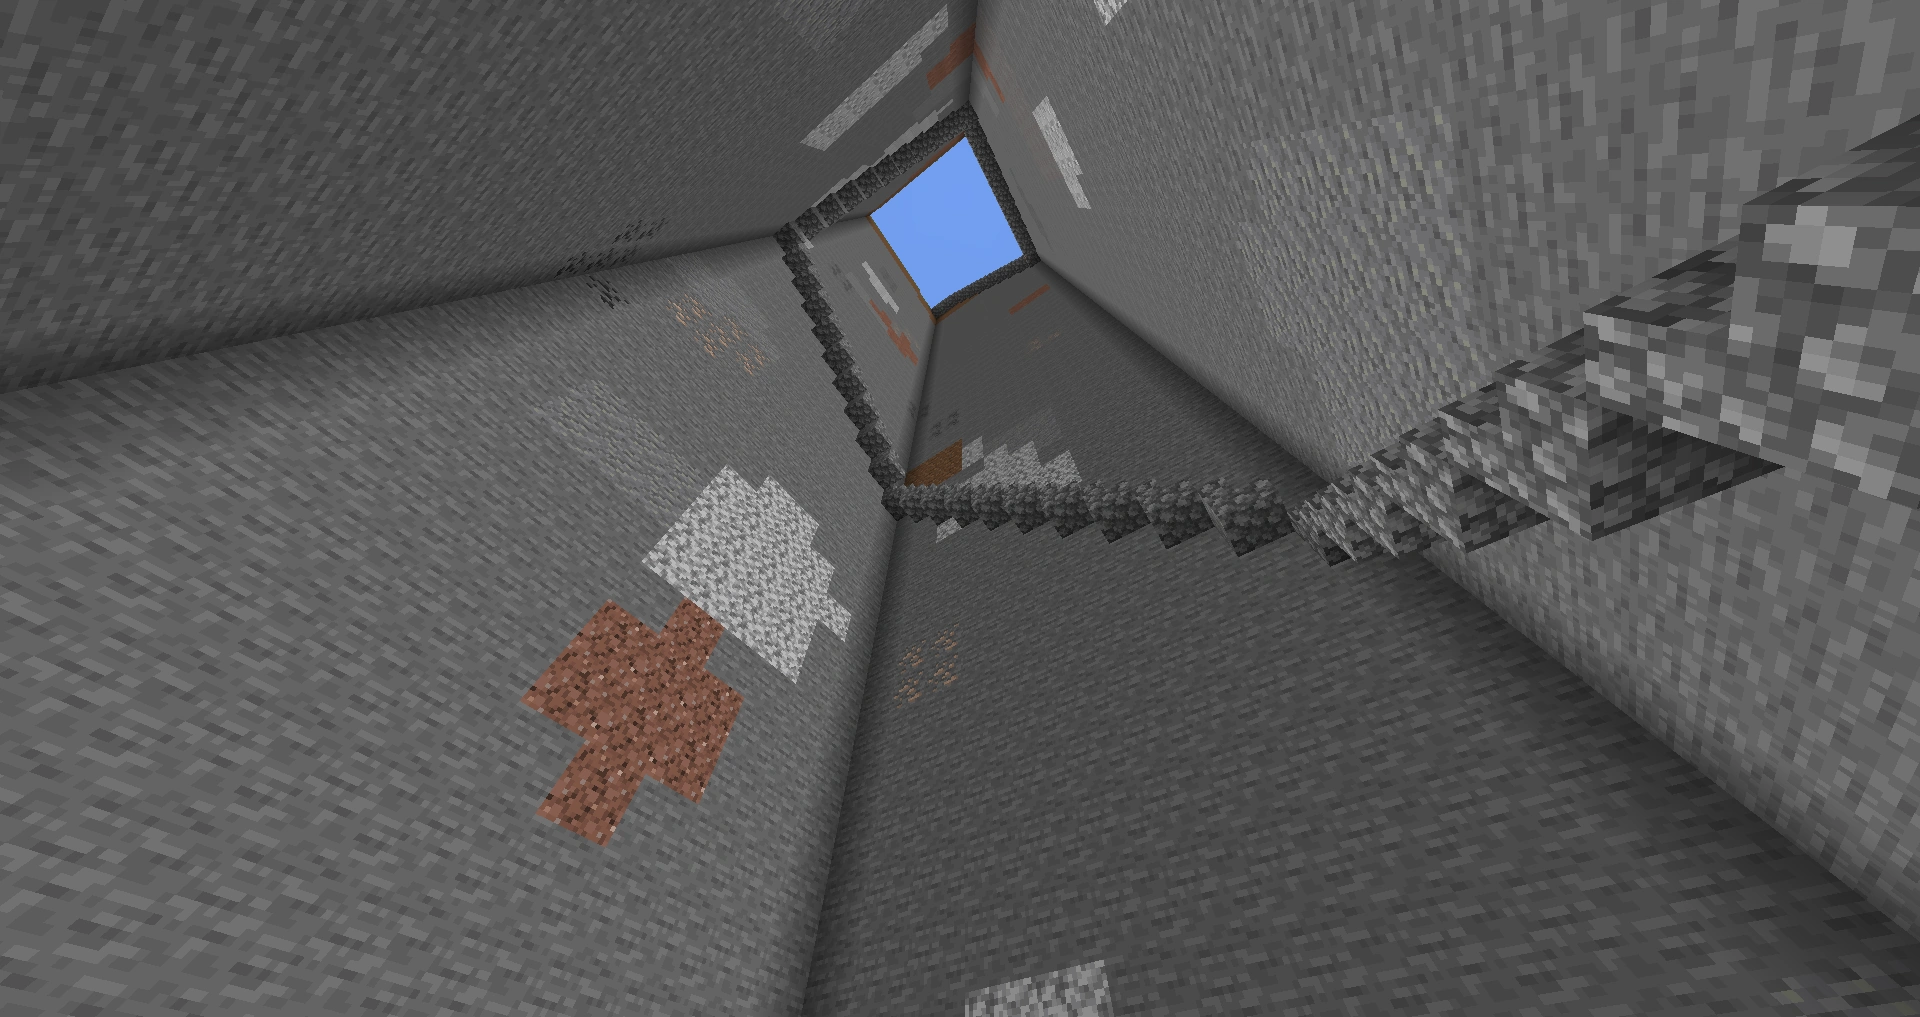
Looking up from the bottom of a quarry mine.
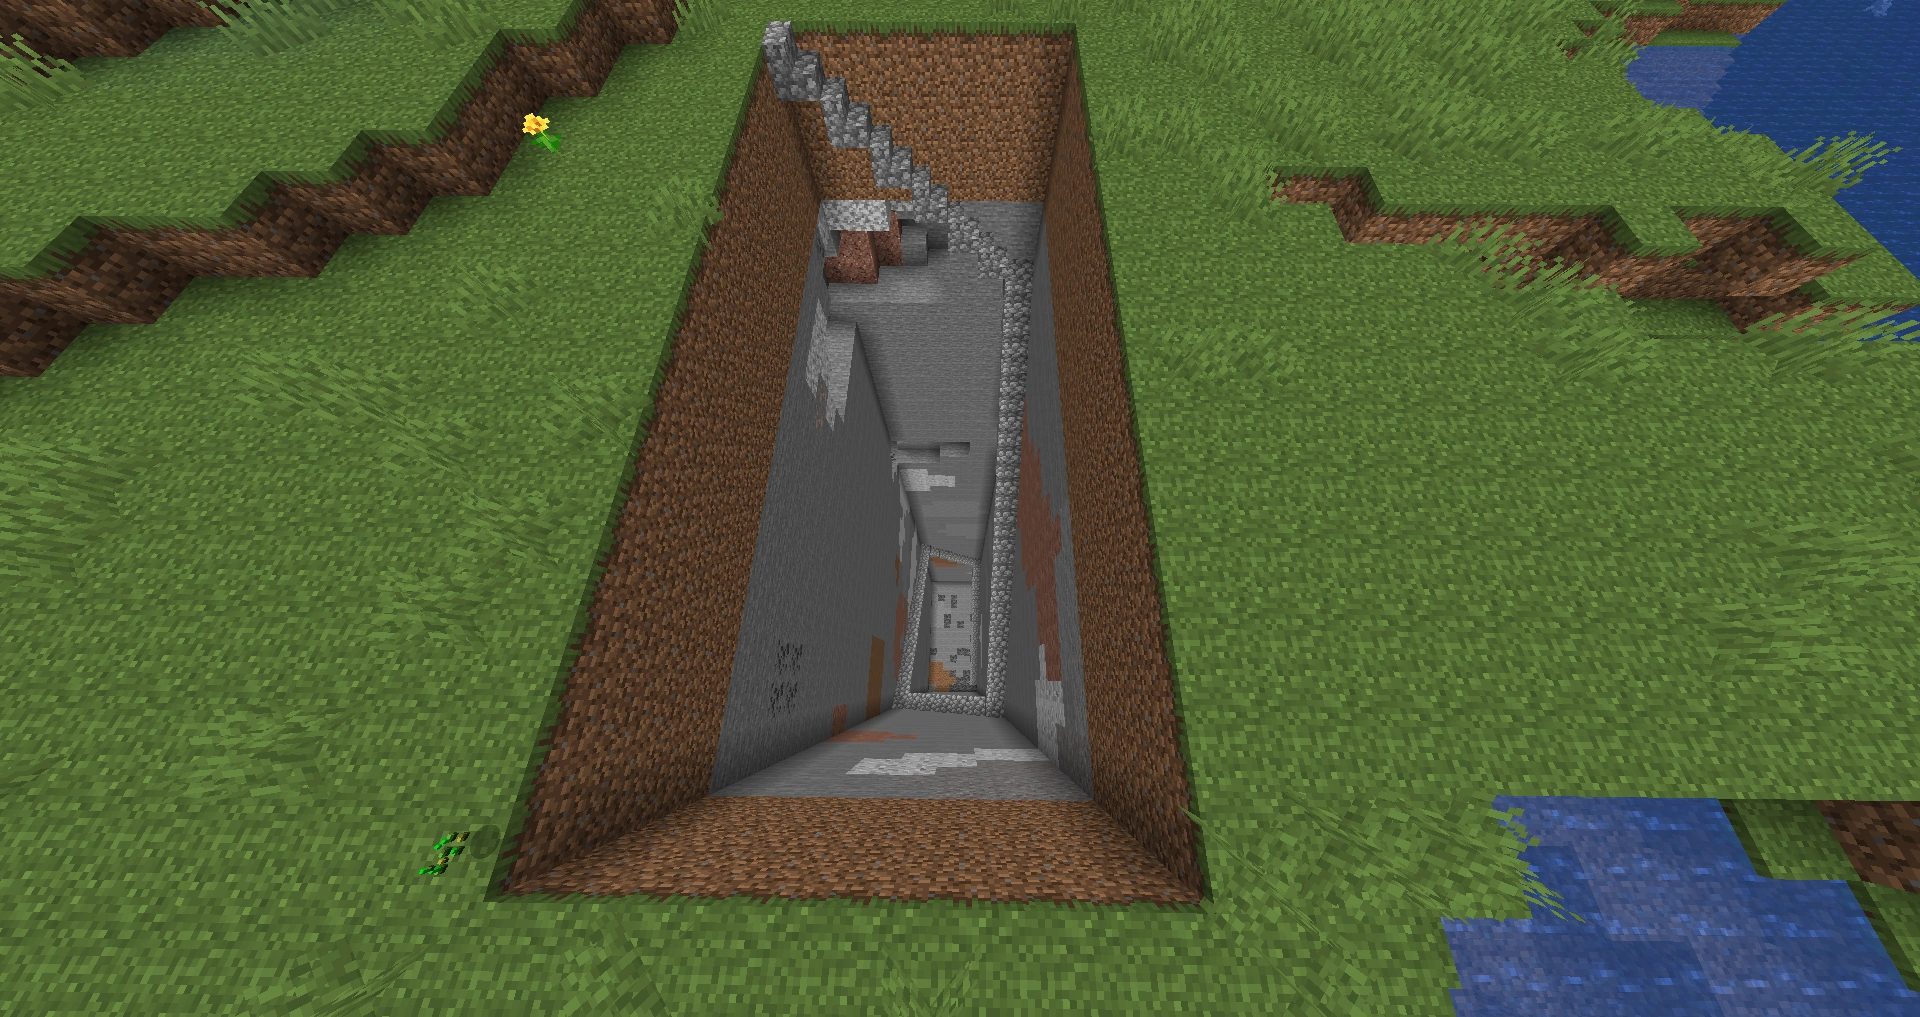
An unfinished 20×20 quarry.
A 25×25 quarry to bedrock.


The construction of a quarry is as follows:
- Determine the size of the project. There is no standard, so simply choose how big players want it to be. However it is advised that they make the area large, to maximize resources within a single quarry. (A typical quarry can be 20×20 or 20×30, for example)
- Once the player have found a large enough space, dig down one space at the corner of their site. Next, mine the block adjacent to it. Continue this around the perimeter of their site until they have a 1-block-deep trench around the perimeter of the site.
- Now that the player have set their perimeter, mine all of the surface blocks within their site. When this is finished, they should have a large, square, 1-block-deep hole in the ground.
- Next, head back to the first corner that the player have dug in, and dig down one more block. Repeat what the player have did in step 1, but now they will be one level lower. Upon completing this level, they can begin placing their staircase/ladder/vines as well.
- Continue the process of mining a layer, and then another, until they hit the bedrock level. This may take a few days of vigorous playing to accomplish, but their earnings will make it well worth it. For reference, 20×20 quarries (down to bedrock) typically yield 3 - 10 stacks of coal, 1 - 7 stacks of iron ore, up to half a stack of gold ore, perhaps 50 redstone dust(lower down), and a few lapis lazuli and diamond, though these results vary with the width, depth and location of their quarry.
- Various game mods may also provide tools for quarrying or similar rapid-mining techniques.
Really reckless miners have been known to make huge quarries, some giant ones are 50×50, 64×64 and 80×80, yielding a staggering 2200 stacks of cobblestone/stone. To put that in perspective, that many cobblestone blocks in a tower would be a whopping 140,800 meters tall, or an unrealistic 170 times the height of the Burj Khalifa, which is the tallest building on earth. These will take a couple weeks of 24/7 gameplay, given their size, but the stone payoff is gigantic.
Example:
Key: - = Air
     B = Stone block
     S = Staircase
Top of mine:
         BBBBBBBBBBBBBBBBBBBBBBBBBBBBBBB
         BS----------------------------B
         B-----------------------------B
         B-----------------------------B
         B-----------------------------B
         B-----------------------------B
         B-----------------------------B
         B-----------------------------B
         B-----------------------------B
         B-----------------------------B
         B-----------------------------B
         B-----------------------------B
         BBBBBBBBBBBBBBBBBBBBBBBBBBBBBBB
Next few levels down:
         BBBBBBBBBBBBBBBBBBBBBBBBBBBBBBB          BBBBBBBBBBBBBBBBBBBBBBBBBBBBBBB
         B-----------------------------B          B-----------------------------B
         BS----------------------------B          B-----------------------------B
         B-----------------------------B          BS----------------------------B
         B-----------------------------B          B-----------------------------B
         B-----------------------------B          B-----------------------------B
         B-----------------------------B          B-----------------------------B
         B-----------------------------B          B-----------------------------B
         B-----------------------------B          B-----------------------------B
         B-----------------------------B          B-----------------------------B
         B-----------------------------B          B-----------------------------B
         B-----------------------------B          B-----------------------------B
         BBBBBBBBBBBBBBBBBBBBBBBBBBBBBBB          BBBBBBBBBBBBBBBBBBBBBBBBBBBBBBB
Although the yielded amount of cobblestone, dirt, sand, coal, iron, and to some extent gold, will be enormous, and the possibility of lava is very high, this is not the best method for mining diamond and lapis lazuli, because they're found only at the bottom of the map. (Note: Diamonds and lapis lazuli can be mined using this method, but due to their rarity, the placement of the quarry along with its size will determine the amount.) This type of mining is suggested for getting large amounts of cobblestone, iron and coal, besides the ability to gain large amounts of resources, this type of mining exposes many caves for further exploration and mining.
Besides mining, quarries also offer some non-resource related benefits, such as keeping the area clean and fresh (not ruining the nature), as well as serving as a handy trap.
Warning: Be extremely careful around this mine, as a fall will surely be fatal, unless they have covered the 2 bottom levels of it with water. Make sure the shaft is either covered up by a layer of blocks or a fenced perimeter. The shaft should also be well-lit to avoid being a mob pit.
Once a quarry is finished, they will have a large, deep hole. There are many ways to utilize a spent quarry, but some choices are as follows:
- Underground Base
Due to the open nature of a quarry, many players choose to build an intricate base floating in the quarry, and then fill in the unused space with dirt, gravel, sand and stone. If done correctly, an underground base will be undetectable from the surface, especially when grass grows on the surface above it. For extra stealth, consider planting trees in the open area. They can deter miners by placing a large lava lake over the base. This will also decrease hostile mob spawns around the base.
- Structure space
When their quarry is complete, they can fill the area with a structure such as a skyscraper or a tall building. This is more effective than building at sea level as some buildings can be taller than 256 blocks, so they can build from bedrock level and make larger structures.
- Underwater Base
These are made by the same method as an underground base, except the open area is filled with water from artificial springs, lakes, rivers, etc. For additional effect, a lot of players build underwater bases from glass blocks, and build airlocks for extra stealth. Most quarries are square or rectangular, so it is hard to disguise an underwater base as a natural lake or pond, but with a little bit of work, they can make it look like a natural body of water.
- Multi-level Grinder
After finishing their quarry, the large area mined out can make a perfect space for creating a large multi-level grinder.
Tunnel-mining[]
This involves digging a long tunnel. The player will need a lot of planks (for sticks), and optimally, crafting tables, chests, and furnaces. The simplest tunnel is 2 high by 1 wide (1 high by 1 wide using suffocation prevention with trapdoors[Лише у Java Edition]), but the wider and higher the tunnel, the more cobblestone they get per chunk, the more they have explored (they will not gather cobblestone any faster, also they will get less ores). Dig at about level 50 if under land; 40 if underwater; or 12 if for precious ores. The player may want to use the cobblestone to seal off caves already explored. This is like a quarry — but more useful since less resources are spent going through the dirt/sand layer, and it can also be used in conjunction with minecart tracks to go from one base to another. A 4×3 tunnel that is 1800 blocks long will yield as much as an 18×18 quarry to bedrock, though arguably safer as they won't hit the lava layer, and it will yield more diamond/redstone if at layer 12, as well as the fact that falling in is completely non-lethal.
A 2×1 shaft is probably the highest-yielding way of mining for ores that is. Mathematically, a 2×1 shaft reveals 8 blocks for every 2 blocks mined forward, so the basic premise of this system is that digging little 10-block deep side shafts off of their main tunnel, as in branch mining, does not yield any more ores than digging straight as their yield will be highest if they simply keep moving forward and mine endlessly instead of stopping a 2×1 shaft will also lead them into plenty of caves, which could be good or bad depending on how they have feel about those. A good strategy for cave run-ins is to make a quick run-down and nab any visible ores, then find their shaft and keep moving. If they don't want to walk all the way back home after digging this, just dig in a "U" shape until a little less than half of their pick is used up, move 8 blocks to the side, and go back. The 2 biggest problems with this kind of mining are: A. It takes a lot of torches, though their coal yield is way higher than the amount they have spend on torches, and B. They have covered a lot of distance, therefore their chances of having lava run-ins are pretty high.
A variation on this kind of tunnel-mining is to drill a finger tunnel into the stone for 20 blocks, placing torches as they go; retrieve any ore found; then recover the torches as players exit, plunging the tunnel back into darkness; then block up the entrance to the finger tunnel with just two blocks of surplus cobble. By leaving the finger tunnel unlit, and unfilled in, it's true that monsters may spawn later, but they are trapped in the walled-off tunnel. Be careful not to mine back into the same area later and also, there is a low chance that monstrous noise might become disconcerting later.
Multi-mining[]
The name fits any combined mine such as the following:
Quarry-Branch Mine[]
This involves digging a quarry and adding ledges every few blocks down around the outside while digging. The sides of the quarry have to be a certain length, for example with a two-space branch mine, the player need each side to be 3n+1 blocks long. The result will vaguely resemble a shopping mall atrium with one massive open space and then a bunch of "shelves". Then, dig the shafts to at least 20 blocks for a ton of ores, including quite a few diamonds (about 3 veins) down on the lower levels. For a 10×10 quarry, they will get about 150 stacks of cobblestone, while for larger mines (e.g., 40×40), they will get around 2000 stacks, handy for massive building projects.
Quarry-Cave Mining[]
Dig a quarry down to under Y-level 25, and attempt to unearth a cave. If they did, they can explore that cave. Many of the deeper caves have no surface entrance, and being able to expose a cave that is otherwise sealed to the outside world through a quarry can garner them both large amounts of cobblestone, dirt, and gravel, as well as the rewards of mining out a deep cave. If they don't want to hold on to the stone that is excavated, they can use it to fill in dead ends, allowing them to navigate the remainder of the cave more easily.
Quarry-Drop Shaft Mining[]
This involves basic quarry technique but in small squares. First, the player decide how large they want the mine to be. For example a make a 3 by 3 hole then go over 1 block and repeat for a 2 by 2 square quarry. Also this allows for maximum ore exposure. But they would need at least a 3 by 3 squares, going all the way to the bedrock layer.
Warning: This can be very dangerous, as they can run into hidden caves, dungeons, lava pools, and abandoned mines.
Mass Mining[]
For those who favor mining in a straight path but try to not make it very long. Once they have reach the bedrock level, go up a few blocks and start mining and make it a large corridor. If the player reach a cave, continue to make the large corridor and secure the cave. This will give the player large stores of cobblestone and more of a chance of finding lava. Find ores that are nearby that would be hidden if the player did another technique and did not get lost in their mine. This a very basic technique yet a tiring way of mining. It is suggested to use a diamond pickaxe with max efficiency enchantment and unbreaking enchantment so that the pickaxe doesn't break during the process and also consumes less time compared to using a non-enchanted stone pickaxe.
Special techniques[]
TNT mining[]
TNT mining is dangerous. If they must do it, they can use the 3-in method: First find a solid stone wall, mine 3 blocks inward, then the player place 1 block of TNT on the third hollowed out space. Once placed with flint and steel in hand, they right-click it with the flint and steel and back up a few steps and quickly block off the front of the hole with one block of stone. The explosion should create a perfect 4×3×3 hole. Repeat as desired.
A much faster but risky technique is mining in a small alcove, filling it with multiple units of TNT, and igniting it, creating a fairly large cavern. While this variation uncovers a large number of blocks at once, the explosion can let a large amount of lava leak in, making the cave hard to access and burning any drops created by the explosion.
TNT is expensive to manufacture (requiring 4 sand and 5 gunpowder to make 1 TNT), thus another mining technique to maximize the use of each TNT is to dig a 2×1 tunnel 4-5 blocks into the wall, then at head height mine 2-4 blocks (depending on desired size of hole) to their front, right, left, up and down. Place 1 block of dirt to act as a stand for the TNT to explode in the middle. The explosion should create a roughly spherical shaped hole averaging 8 blocks in diameter. This method destroys more blocks per TNT but requires more use from the pickaxe in order to carve the space around the TNT. Since this only creates a single explosion unlike the previous technique, the items dropped from the broken blocks will survive.
Silverfish Mining[]
The player can use silverfish to clear a lot of stone away to reveal the valuable stuff. To do this, get a bunch of silverfish in a hole, and position themselves above the hole. Most of the silverfish will go into the stone, but make sure there are at least some left visible. While standing above the leftover silverfish, throw a splash potion of poison, then a splash potion of regeneration immediately after. Every time the poison hurts the silverfish, it will call any nearby silverfish out of the stone, then it will get healed by the regeneration potion, so it can keep getting hurt instead of being pinned at 1 health. Soon, all of the silverfish will come out of the stone, and they can kill them at this point, then mine all of the minerals left behind.
The easiest way to transfer silverfish to different places is by leading them through the Nether. The player can do this by putting a nether portal by a silverfish spawner, however they will need a path of blocks they can't enter, and another portal for players, farther away with a different exit. After luring a batch of silverfish through their portal, they go through theirs. The player will have made walls and a trail in advance. The walls and trail contain the silverfish, but lets the player see and follow them without being able to reach them. Two levels with a glass walkway for them above their path can do this, just make sure they can't reach the player's level (and none of the blocks are stone they can enter). Also, they may need to see the player once without glass, so they know where they are. Then lead them to a third portal leading to their mine, and voila, the player have transported them to where they want to mine at.
Шаблон:CollapsedVideo
Wither Mining[]
Another way to get many resources acquired from mining very quickly without having to use up tools or TNT, is to use the wither. The wither, unlike most other mobs, has the ability to break any block that can be mined by the player. In addition, if a block is destroyed by the black or blue skulls of the wither, it will drop itself (see Explosion for more details). However, be very careful when attempting to mine by using the wither when in Survival mode, as the wither has many defenses, and is able to deal a great amount of damage to the player. So, make sure to either have high quality weapons and armor, or make the wither mine so that it is impossible for the wither to attack the player.
Piston Mining[]
Piston mining is a technique for safely extracting small amounts of valuable ores, usually diamonds, and for inserting 'windows' into potentially dangerous spots.
- Start by digging a 1×2 hole in a safe spot a few blocks to one side of the target area. If no truly safe spot is available, pick a location where the risk is least.
- Place a block and a piston in the hole. Any block moveable by a piston will do. Glass would allow the player to see hazards without triggering them. An efficient method is to place one block of glass, then use 'filler' material for the subsequent blocks.
- Dig another hole a few blocks to the other side of the target area, ideally in another safe spot. When doing this, don't forget that the maximum distance a piston can push is twelve blocks in a straight line.
- Activate the piston using a redstone torch, lever, button or pressure plate as the player prefers.
- Insert another block, re-open the 'receiving hole' if necessary and reactivate the piston.
- Repeat until the ore can safely be collected, or the glass block has revealed a hazard or confirmed all is safe. Note that they may need to check several rows before they can be entirely sure there is no danger.
- Retrieve the piston for reuse.
This mining method is only practical for collecting very small amounts of ore, but it can be useful for collecting diamonds from dangerous spots or when players suspect a natural hazard is nearby and they want to locate it precisely.
Aesthetic Mines[]
This section is for mines that focus more on aesthetics rather than efficiency.
Vertical design[]
Design[]
This design consists of a Hub and a Push leading into another Hub.
Key:
   B - Block
   _ - Air
Hub: Top view:
         BBBBBBB
         BB___BB
         B_____B
         B_____B
         B_____B
         BB___BB
         BBBBBBB
Side view:
         BBBBBBB
         BB___BB
         BB___BB
         B_____B
         B_____B
         B_____B
         BBBBBBB
Each push is basically the design behind it (The side view) dropped a square repeated several times, the amount is dependent on the miner but an even number is preferred due to torch placement. (Discussed later)
The central hub (The first hub made in the mine) will have 4 pushes in each of the cardinal directions, eventually, if players are in need of ores they may choose to go down in one direction until the player have what they need. It is recommended to check the Y-coordinate about now, they may want a push length that will allow them to get to their Y-coordinate value as close as they can to 12. (Lava spawns in caves at 10, and their Y-coordinate is up 2 for the positioning of their head) After the player's decided on the length and finished a push, make another Hub in the same size as above. Continue until they reach the last of their hubs, and they should end it before they hit the bedrock layer, otherwise it won't be very nice looking.
Torch Placement[]
Torch placement is simple in this design. The player will have 8 torches in each hub, on both sides of the bottom of the corners. If the player want, they may add a torch to the center floor to add more light, but it is enough to prevent mobs spawning as it is now.
For every push, put two torches on every other left and right hangs.
Connections[]
After players finished all of the cardinal pushes, they will be wondering what next to do, considering the amount they have mined, they may want a place to store away items, connections are great for this.
Each connection is a hub formed by two of the cardinal branches intersecting, meaning if players went to the first north hub down, they would have to mine one push or hub to the left and connect to it from the first west hub down by pushing right. It's the same as the hub but it leaves two walls with nothing to do, if the player try to continue with them, they will get intersections that are hard to make aesthetic unless the player are looking for a large open mine, or a maze mine. Instead, the player can use it for chests, and it works well for its purpose. Very hard to describe with letters, so here's a picture instead: Picture
Continuations[]
After the cardinal directions are done, players have their as many connections as they care for, continue adding onto their bottom hubs, only with straight pushes. The bottom hubs will branch in all directions except backwards, unless the player are going with an open or mine variation, and each of those hubs may spread in the same direction so long as it's not backwards for the original hub. If they positioned well in the first central hub and push size, they will be scraping a long in a fairly wide tunnel along the same height the player find diamonds. It's easy sailing from here on.
Variations[]
- Central Drop shaft
Central hub is under an area of flat ground, dig three deep holes where torches will go, ladders go on the bottom and top, torches in the middle, players go above the hub as normal only there will be a 2 high gap under the hangs on this first hub to allow for the ladders as a way up. The player will need the ladders to go all the way down, and such won't have a place for a torch. They can circumvent this by putting them on the middle of part left over at the top of the next section, the lighting is the same and players won't need an extra torch to prevent mobs spawning. This also works particularly well if they want to replace the top with glass.
- Open Mine Connections
Same as original, only every connection made splits off in all four directions. It goes up with a 1 wide path in the center in all four directions and the both of the two wide paths go down until they merge, which is when it can do so without getting rid of the upward patch.
There are two variations, one where players will go up when they make a connection, so they will have a stack of hubs in all directions, another where they only dig down in the connections, where they intersect their build the 1 central path down to the hub. The latter is more efficient as all of it will eventually lead to the bottom and therefore be mining ore.
- Maze Mine Connections
This is the same as an Open Mine except player's down path is one wide, not their up path. Same two variations, same correlation in efficiency.
- Lava lights
Players can replace the torches in the center of the hubs with a piece of glass and lava under it and it gives only one light less, providing that they placed them at all. They can change it for a 3×3 if they feel so inclined and have enough lava.
- Drop Shafts
This combines the Central Drop Shaft and optionally the Open and Maze Mine Connections. It requires close tallies if they don't want to combine them though.
At the hub, mine down the same as if they were going to make a Central drop Shaft, but continue until they are on the same level as their next hub, depends on the size of their push, like a 8 push would be 8 blocks down. After they reach the bottom, make another hub in the same style as a Central Drop Shaft. This will require more ladders, so it's not a very good idea if players are short on log, but it allows a certain maze quality.
There are two places where they can put the ladders, but the two per corner type of the Central Drop Shaft style is preferred, however the other style uses less ladders.
The player mine their shafts in the blocks directly north/south/east/west of the center so that they have 4 shafts all the way to the next hub, this require 5 blocks to hang down from the hub, some like it, others don't.
Two variations on top of that, they may use the drop shaft for all hubs, thus any hub with a hub above will be able to ascend, or they can only use the shafts for the central hub, adding 'terraces' to their mine.
After players get down to the bottom level, they may continue to stretch out and connect with the original push/hubs. Once they connectted, they may use the open style, leaving 1 wide path up or the maze, leaving 2×2 wide up.
Other Aesthetic Mine Ideas[]
Central Mine[]
The player should change the rail-torch-rail combination to powered rail-redstone torch-powered rail combination every 34 blocks.
Players will have a central rail system with smaller hallways for pedestrian traffic. On interesting locations, players should add some kind of rail station with access to the rail.
Side Mines[]
Connections[]
(From the top)
Random Mining[]
Mining randomly is very simple: dig, dig, dig wherever and however the player just happen to feel like digging at the moment.
Very simple, and potentially the most rewarding type of mining around: the player can find dungeons, massive cave networks, and maybe the hostile mob base. However, it is also potentially the least rewarding; it's possible to miss all the ores, as this method offers little consistency.
Random mining can very well be the most dangerous method. The player can get lost, mine their way into lava and thus lose their items, into a ravine, into a skeleton spawner with 5 skeletons, or even into their own 40 block drop. Alternatively, they could embarrass themselves by mining straight up into a patch of gravel or sand, or flood their mine by digging into the ocean.
That being said, there is one major benefit to random mining; it will confuse potential griefers. Surrounding a main base with all kinds of twisty passages is a viable option, though it won't ultimately stop a determined griefer from finding the player or their base. This was the most used technique in Pocket Edition, before the cave generation update.
Space/Portion Mining[]
Not to be confused with Strip Mining; however, this does involve a similar method.
Room Mining[]
This form of mining involves someone to make a hall way and then make a small opening in the wall. From there, one must simply dig out a portion of the block to create a space. This method is repeated many times down the hall on either side to create rooms for various purposes, while finding several ores and valued materials in the process. This method is useful for the creation of houses, barns, indoor-gardens, storages, and in the creation of hard-to-find/secret places as it offers a variety of places one may go to in order to find something, but they may likely give up in the process unless they are determined.
Tunnel Mining[]
This is highly similar to Room Mining, except that instead of building rooms, the player build tunnels. However, this takes much longer to do and tunnels are usually much larger than rooms. Because of this, Tunnel Mining is lesser to be used as the tunnels take up many tools in the process of making them as well as the mining process may dig into a body of water and flood the tunnel. However, if the player wants to make an artificial river for boats, this may not be a problem. Despite the fact that they may yield many resources, players may use up several pickaxes or shovels in the process of making them as well as torches to light up the tunnel. Players may get bored of doing this and may abandon the tunnels while still in the process of making them. Some may not consider beginning construction on future tunnels due to lost supplies and the tunnel not being rewarding enough to continue. This method is useful for making minecart subways, large indoor-gardens, art galleries, tree farms, boat rivers, large barn(s), mazes, doing construction on vertical and horizontal structures, constructing strip mines, and secret/hard-to-find areas by making tunnels that seem to go nowhere.
Clear Mining/Safe Mining[]
The general purpose of Clear Mining (or Safe Mining, whichever one may prefer to call it) is a variation of Box Mining and other simple techniques. A player first finds a suitable area, preferably one block above the bedrock layer so that the player can easily obtain diamonds and other rare minerals. The player must also have at least 5 to 6 stone picks, one iron pick for rare minerals such as gold, and 3-4 shovels for gravel. A sword is optional depending on the players preferred difficulty settings. Once the player has found a suitable and deep area that they are confident in they may either begin or set up a small chamber near the area to store minerals and construct tools to further their mining. To begin, make a simple 1 block wide and 2 blocks high that spans roughly 8-10 blocks in length. Once this has begun, the player then uses their stone picks to mine directly in front of them where their tunnel ends, but, there is a catch. The player does not move once they make their initial 8-10 block tunnel, and mines only the above block of the two block height making a small box, 4 blocks long. Once the player makes a half tunnel 4 blocks long, the turn to their left or right and do the same; not breaking any of the blocks below the first block. (When it is done the concept is much more simple) After the player makes a reversed "T" shape, then the player can start to mine out the remaining areas around the tunnels, only using their reach length to clear away stone and any materials. Once the player has maxed out their reach length, they will be in small "box" that reduces risks of being suffocated by gravel or possibly lava. The player then should have a clear area, and then mines out the remaining second blocks, still avoiding the "edges" of the safety box. Once all materials are mined, the player can then break the box and gather the resources in one quick run. Once the player is done in this, there will of course be small "edges" that they not reach, and these should be mined out making a clear box. To further the effectiveness of this strategy, one may then place torches in the "frontal" corners of the area and repeat the process on each side, however this time, rotating their view to clear away all areas of their reach, so long as they are away from their initial entrance tunnel. The end result should be a very fast, resourceful, and safer approach to mining at bedrock. However, mobs may spawn in areas of the mine that are poorly lit, and lava is a factor, along with tediousness, so the player must make a commitment to a clear mine, leaving when satisfied with their bounty of materials. Like parenthesized above, this strategy is best played out rather than explained.
Amphitheater Mining[]
Start with a basic U-shaped mine, and make an "amphitheater" down the levels until the player have a one-block space. Then, make a doorway ahead to make another amphitheater mine. This is very useful, and the player can even make it decorative by adding staircases as stairs or chairs.
Wanderer mining[]
This is a simple mining technique, but isn't used much because of the risk of getting lost. Start by making a staircase down until the player reach the level where the desired ore is most commonly found, and begin mining. Occasionally change directions and make multiple branches. If there is a rise, plow through it. If there is a fall, bridge it with cobblestone. The point is to cover as much area without changing their Y-coordinate.
OCD Mining[]
This form of mining is relatively simple. Find or make a cave. When the player found ores, dig it out. Then, measure the longest side of the ore. Turn the small hole into a perfect cube and they will probably find more ores.
Shovel Mining[]
Simply create a staircase to the desired depth and make a tunnel to find pockets of dirt or gravel. With a shovel, mine all dirt/gravel and search the created cave. It is very similar to caving, except they are making their own cave. This technique is very useful on older server where all caves had been explored. The advantage is that players don't need to spend too many resources on tools, because they mainly use shovels, a cheap and reasonably fast tool. On the other hand yields are smaller than from caving or strip mining.
Worst Case Scenarios[]
If the player falls into lava, do not panic; swim upward to get out, then try to get far away from the lava and to water if they can. This way even if they die, their items won't be destroyed by the lava. If they need to heal, eat golden apples or drink some Potions of Healing or Regeneration and hide in a corner/away from mobs, and make sure they use a water bucket if they have one. If the player know they are going to die anyway, press F3 and F2 (and also press fn together if the F2 or F3 button has other functions) to take a screenshot of their coordinates. If they are burning to death, trapped, close to the lava, stand in a corner and encase themselves in a dirt or other hand breakable shell. Once they die, their items will be contained safely in the shell.
If they are trapped in blocks and are suffocating, try to dig looking downwards. This could assist them in getting out of the trapped pit.
If they are fighting and are going to die, press F3 then F2.
Whatever happens, they should look back upon what they did, and analyze how they died, and what they could do to improve.
If their pickaxe breaks and they have stumbled into a cave and they have lost their way, the only option is to punch their way out and this could take a while. If there are any nearby abandoned mine shafts, check them out, they can use planks to make a crafting table and tools or there might be a spare iron pickaxe floating around.
If they can, get an ender chest and start to put in their stuff from the most expensive/important to the cheapest/least valuable. When they spawn back to their house, put another ender chest and take out their stuff.
Best Case Scenario[]
Should the player happen to accumulate a large amount of resources, such as, perhaps, 2 stacks of iron ore and 10 diamonds, they may be tempted to delve further into the cavern. Resist this urge and return to their base to empty their loot. Dumping off their goodies instead of trying to explore longer may help in the long run, and will reduce the chance of losing their loot. Having a bed at the base of their mine is also helpful; if the player dies, they will spawn at the base of their mine, hopefully surrounded by their chests full of goodies.
If possible, carry an ender chest with the player to store their valuable resources, or put down a chest where they are at, put their loot in it, and write down the coordinates of the chest. They can come back to the chest later. Find the current coordinates by F3.
Safety[]
When going for a mining trip, make sure that the player take proper precautions to not die because of sand or gravel. Use their best judgement and be careful when digging. When going mining, after they are finished and they make their way back, try to go out the way they came. That way, players know they are safe and there is no risk of lava, water, gravel, or sand falling on them and killing them. Digging a new shaft to escape the underground could result in sand falling on them when it turns out they dug their exit below a desert biome, or they could be drowned when the entire ocean floods their exit shaft. If players do get lost, they can dig up in a stairs pattern so that sand and gravel won't kill players and they won't be drowned if water comes through. If gravel does happen to fall on them, do not panic and immediately hold down the left mouse button to dig the gravel out. This will save themselves from suffocating.
Stairs pattern: A=Airspace B=Block
    A
   AB
  AB
 AB
AB
Never take valuable items when going mining. The player don't want to delve into dangerous caves while carrying tons of iron and diamonds, for if they lose them while mining, they will be sorry. Carry more supplies for longer trips, but don't carry more than they can afford to lose to lava. Normally, they will want to use stone pickaxe for economy, but carry at least one iron pick for advanced ores (gold, redstone, and of course diamond). If they have tons of iron and are impatient, they might use iron pickaxe in general, but while those are faster, they only last twice as long (block-wise) as stone tools, and they will be going through a lot of pickaxe regardless. Take a diamond pickaxe if they want to be fast and efficient for its durability, or to collect some obsidian. Make sure to bring a sword, or at the very least, a bow and some arrows.
Supplies to bring while mining: Crafting table, furnace, sticks, cobblestone, water bucket, picks, swords, food, armor and fishing rod.
ABBA Rules[]
ABBA Rules is a style of caving introduced by VintageBeef where two or more members go caving for a set period of time, collecting ores with Silk touch. Each ore is assigned a certain number of points. At the end the participants tally their points and the winner takes all the loot gathered by all parties. This competitive style of caving was inspired by a song called "The Winner Takes It All" by the Swedish band ABBA, hence the name.
PvP is not allowed and participants typically make use of potions or Ender Pearls if they so choose.
Point System[]
| Ore/Item | Points |
|---|---|
| Emeralds | 7 |
| Diamonds | 5 |
| Gold | 3 |
| Lapis Lazuli & Redstone | 1 |
| Name tags | 7-10 |
| Horse Armor | 7-10 |
| Golden Apple? | 10 |
Iron and coal ore are not worth any points. Gold ingots found in chests may or may not count for points. Name tags, Horse Armor and other loot chest items may or may not count for points - they are usually worth between 7-10 points. Guude found a golden apple in a chest once which counted for 10 points?.
Mine Defense[]
One method for defending a mine is a tunnel collapse system. This essentially has the miner press a button to retract sticky pistons in the walls, pulling torches off the walls. These torches are supporting sand or gravel in the roof, preventing it from falling. When the sticky pistons retract, the torches are no longer attached to the walls, and so they disappear. This allows the sand or gravel to fall, blocking off the tunnel. This can be used in a network style mine to block off the assaulted tunnels while still allowing movement past the blockages. It can also be used to trap assaulting mobs in a "Quarantine Area" and prevent them getting loose in the mine.